Antique Victorian Door Lockset Repair

Introduction

I have an old house, built around 1888. It still has a lot of the original stuff and I try to preserve what I can. One thing I’ve been having trouble with is the door hardware, which is typically worn out or not working. There are expensive reproductions out there, but I’m cheap, and I like to keep what I can of the original stuff. I also like fixing things.

There are two problems I’ve found with old locksets: the cam is worn in the covers so the doorknob rattles, and the springs are usually broken or missing. I couldn’t find replacements for the cams, so I epoxied brass bushings on the wear surface and ground them down to fit. I also had trouble finding short lengths of suitable flat spring steel to replace broken springs, but decided to buy it in bulk and sell short lengths on eBay.

The lockset described in this post is from an exterior door so it’s bigger than the common ones on interior doors, but the repair technique should work for any similar lockset. Also it’s a surface mount lockset; presumably mortised-in ones have the same problems and these techniques will work.

Getting Started
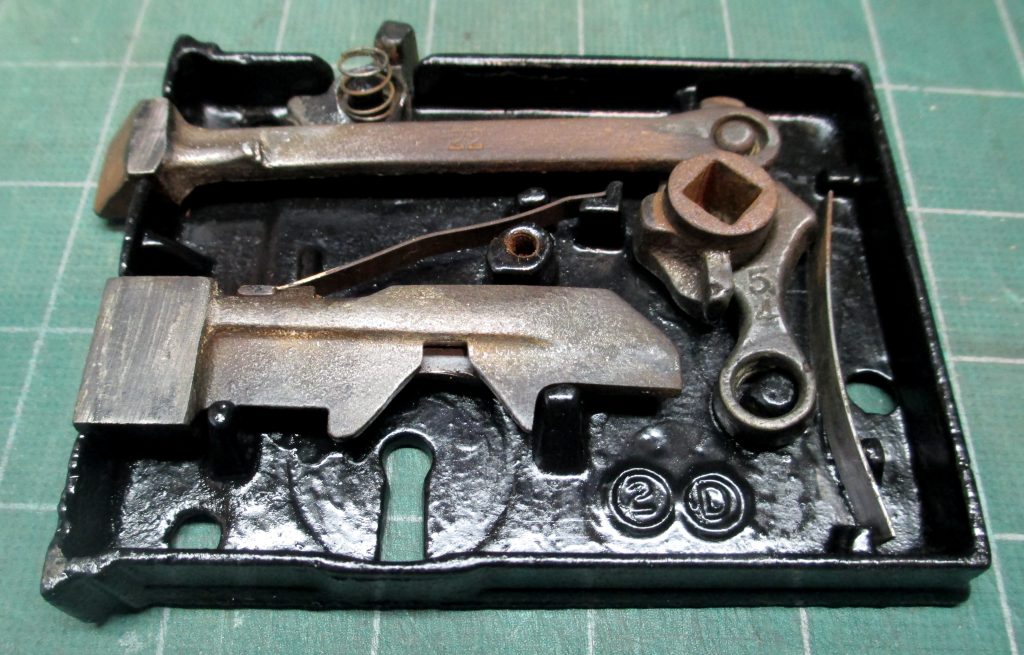
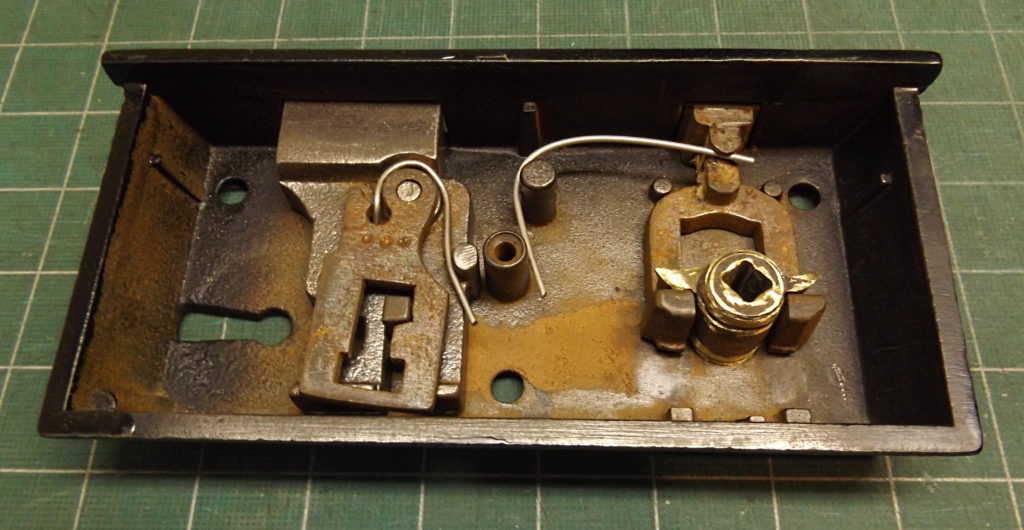
What you will see when you open up a typical Victorian-vintage lockset. This is a “before” picture showing dirt, rust, and all.

Take the lockset off the door and take it apart. Clean and de-rust the parts. Soaking them in vinegar overnight will remove the rust. Remove all paint with paint remover or heat. Wire brush everything and paint the exterior of the lockset. I like satin black spray paint for this.

Now it’s time to figure out what you’ve got and what needs to be fixed. If parts are missing I can’t help; maybe you can find something on eBay. But probably everything will be there except the springs, and any springs that are still present will be brittle with age and may even break when you remove them.

Replacing Springs

Notice the two springs in the first picture. On the left side is some light-weight spring wire somebody added to try to get the latch part to work. It barely did anything. On the right is an original flat spring for the lock bolt part. It broke from negligible force when I removed it.

Another lockset that has been cleaned and painted, with the old broken springs replaced with my flat spring steel. It needs a little grease before final assembly.

I found flat spring steel in bulk and am selling short lengths of it on eBay in various widths and thicknesses. The flat spring steel bends easily and can be cut with an angle grinder or compound diagonal cutters which you can find on Amazon for around $15.

Don’t worry about matching the width exactly — just get reasonably close and you’ll be fine. Also the new spring steel is much higher quality and much stronger than the old stuff so you are replacing, so you’ll be using thinner springs to get the same effect. I suggest using 0.028″ or 0.025″ thickness for door latches, depending on the width.

I’m selling short pieces of the spring steel on eBay cheaply; it’s enough to do several locks. A link to my eBay listing can be found at the end of this article.

Cam Bushings
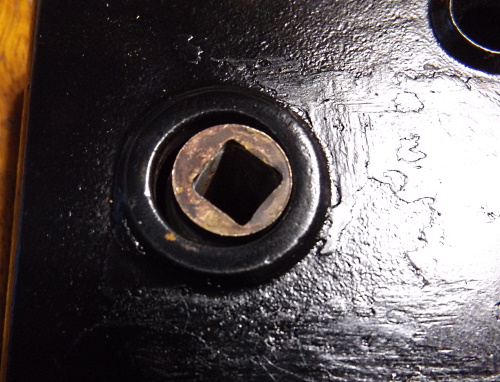
Cam showing wear in the lockset cover. Both sides are worn like this.

Dealing with worn cams turned out to be a thornier problem. My cam was worn out on the bearing surfaces in the lockset covers, which made the doorknob rattle annoyingly. The solution I came up with was to fit brass bushings over the worn ends of the cam, epoxy them in place, and grind them down so they just fit in the holes in the lockset covers. It’s a little crude but it works, doesn’t show, and will probably last a few more decades.

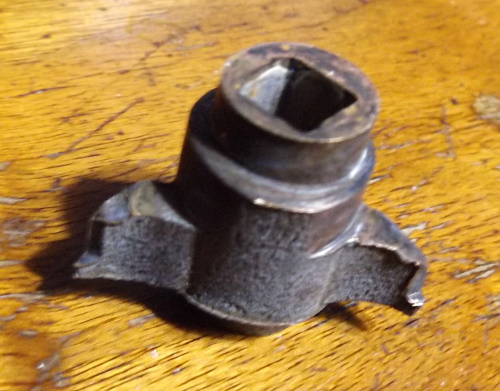
You may find that the “wings” that do the camming are worn or broken. This particular cam was pretty badly worn but it still worked. If your cam is unusable you’re probably out of luck. If you know a source for cams or have figured out a way to repair them, please let me know.

Cam showing wear of the bearing surface.

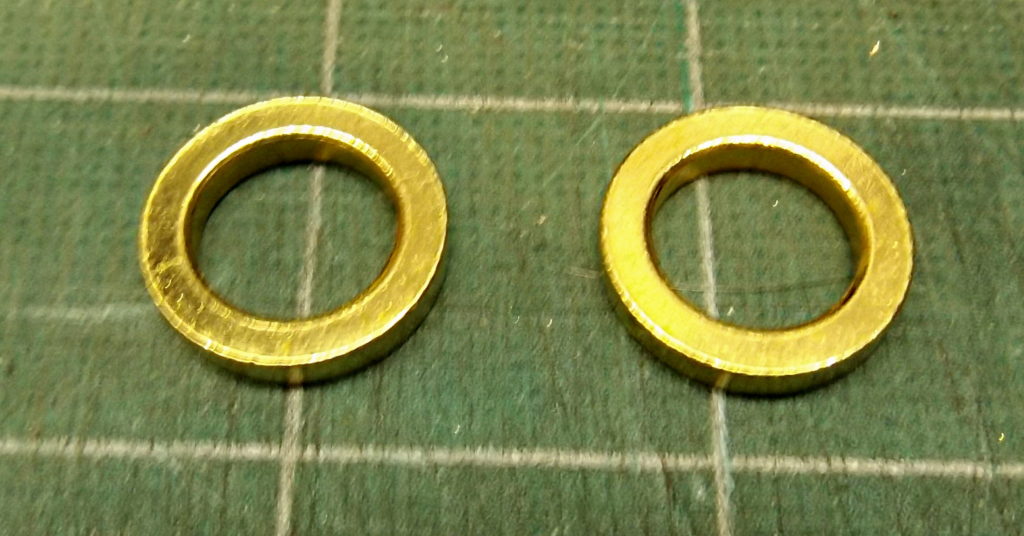
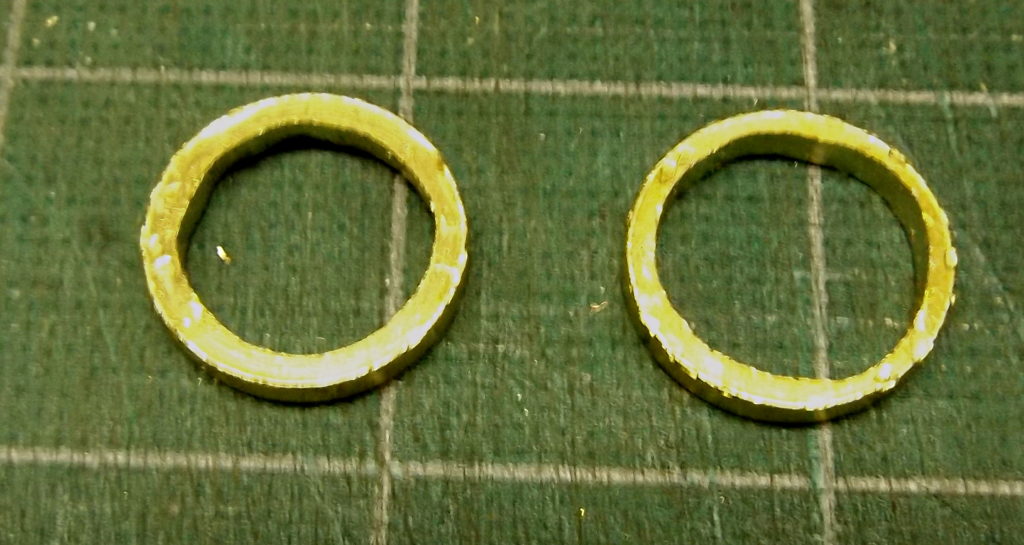
I found brass bushings with an ID smaller than the work cam, an OD larger than the holes in the covers, and sufficiently thick. Again, I’m selling the bushings on eBay at a reasonable price, and a link to the listing can be found below..

Bushings as purchased.
Bushings after filing ID to fit.

I found that a round file works well to open up the ID, but you might find a Dremel tool with a suitable attachment (like a sanding drum or a large-diameter round rasp) may work well too. Keep filing until the bushing fits over the cam. It doesn’t have to be perfect. In my case it only took a couple of minutes.

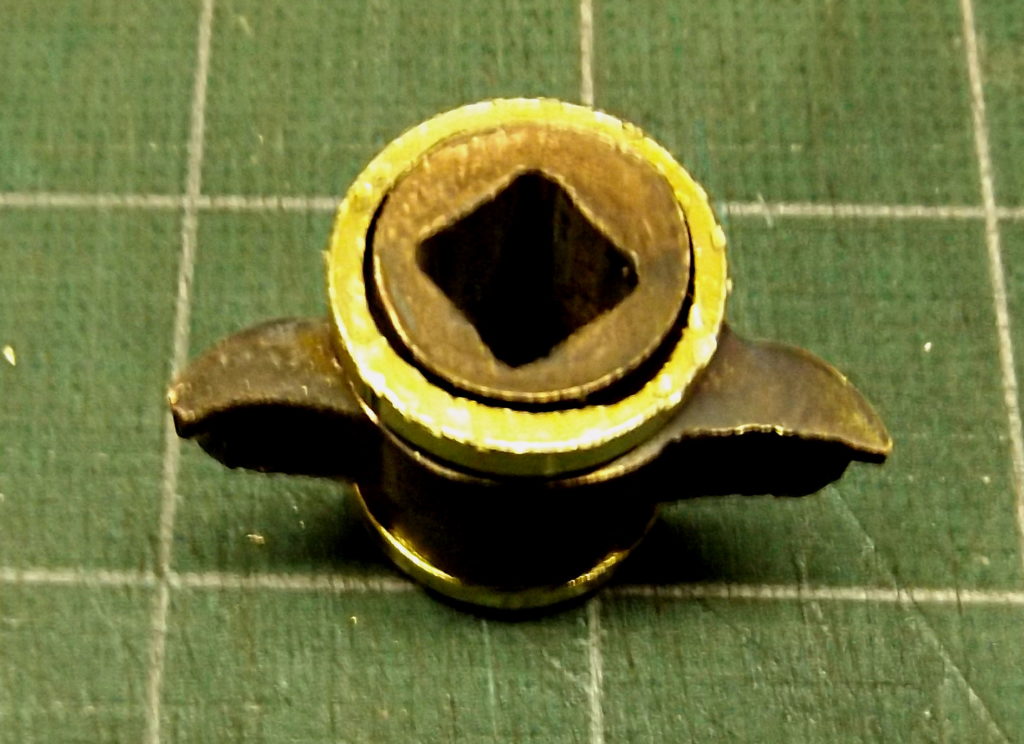
Filed bushing fitted to cam. It’s not perfect but will work fine.

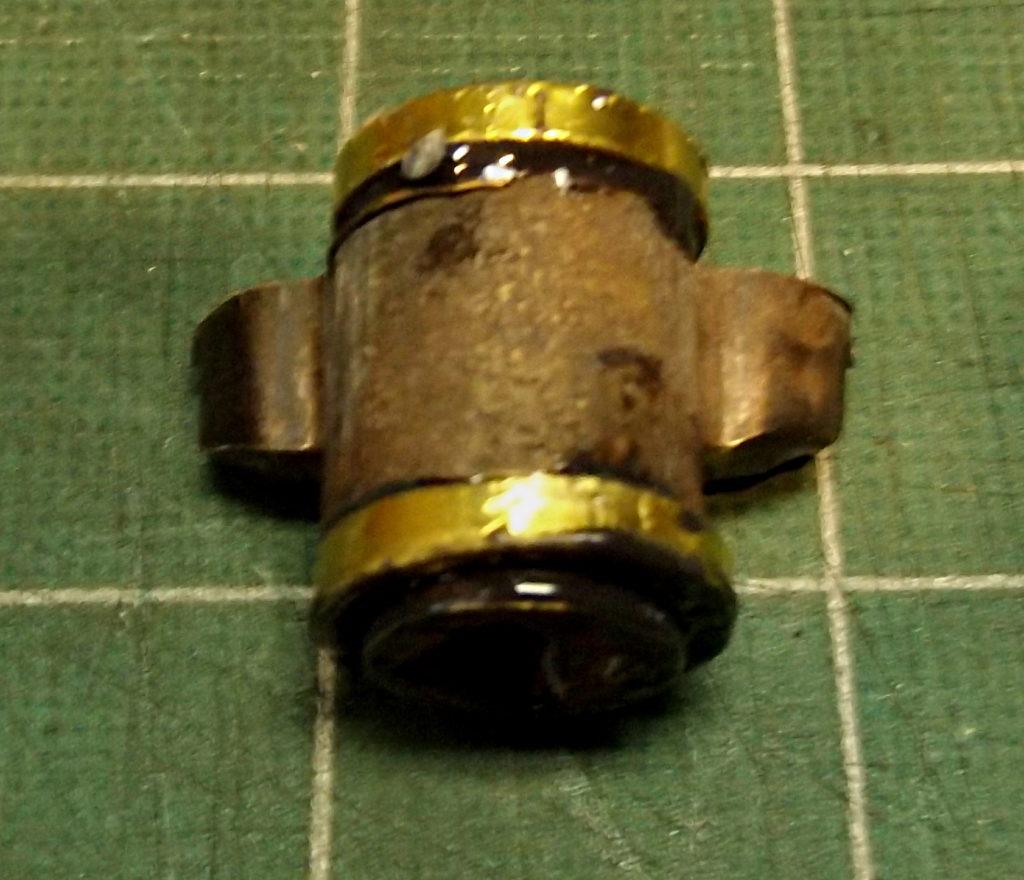
Repeat for the other end of the cam. The bushings will be different sizes so don’t mix them up. Once you have both bushings fitted, glue them in place with good epoxy.

Bushings epoxied in place.

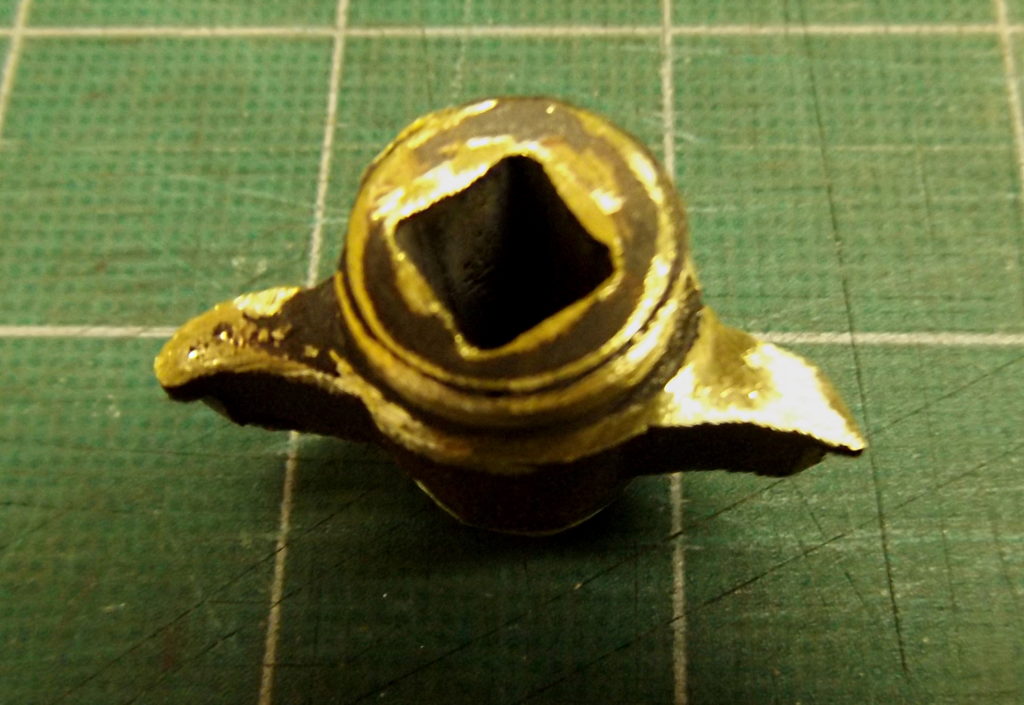
Once the epoxy has cured, start fitting the cam bushings into the covers. I found that a Dremel tool makes short work of this. You can grind down the bushing, or open up the hole in the cover (or both). If your cover has sufficient “meat”, you might want to just drill out the holes in the cover to match the OD of the bushings, which starts out as a fractional size. Fitting the bushings into the covers takes a bit more time, but you should be able to get it done in fifteen minutes or so.

Cam showing bushing after filing OD down to fit.
Finishing Up
Lockset with new bushings and spring wire, ready for some grease before closing it up.

Everything should fit together nicely at this point. Put a little grease on the wear surfaces, put it together, and screw the cover on. You’ll have a lockset that works like new.

Replacing the Spindles

When installing the doorknobs, you might want to replace the spindles with threaded ones (you’ll need new doorknobs too). Threaded spindles allow for finer adjustment than the old-style threaded holes in the spindle. This in turn lets you eliminate some more slop in the doorknob assembly.

Links to My eBay Listings
 

Get a Really Cheap VoIP Replacement for your Landline

I’ve been doing a fair amount of VoIP (Voice over Internet Protocol] work and have learned a lot about replacing both small business and home phone lines with internet-based VoIP service.  I’ve found reasonably-priced products and services, and in this post (and hopefully others)  I’ll share my experience with the options for replacing one or two existing phone lines with VoIP service.

VoIP service is ready for prime time.  It’s crystal clear, and rock-solid reliable.  Even if you have an old-style copper phone line, probably most of your calls are going by VoIP already.  If you have landline service from your cable company, that’s VoIP.

There are a number of existing VoIP services that sell you the hardware and the service all at once, companies like MagicJack, Vonage, and Ooma.  This post is about buying your own hardware and subscribing to a VoIP provider, which can be a much cheaper way to go.

It will cost you well under $50 to get started, and the service will cost about $4 a month per line, plus calls, which typically cost a penny or two a minute.  You pay for all calls: incoming, outgoing, and even toll-free.  But it doesn’t add up very fast, and there are inexpensive unlimited plans available.

Start out with a pay-as-you-go plan and see how much you use, then switch if it makes sense.  It probably won’t.

You can probably keep your existing number.  We’ll go into the details, and how to find out, a bit later.

VoIP is insanely complicated.  Luckily you can get by knowing very little, but I’ll (eventually) be providing links to other articles that will help you in case you have trouble, or provide explanations of things that you’re curious about.

Prerequisites and Limitations

You need a reliable internet connection, since your phone calls will be sent entirely over the internet.  Any broadband service will do; phone service will use only a few Mbps during a call, and almost nothing when idle.

You need to be comfortable with very basic networking configuration.  If you can use the web interface to configure a router, you’ll do OK.

Lastly, you’ll need one or more old-style phones, wired together the way you’re used to.  If you have a big house with many phones, you’ll need to consider whether the new VoIP adapter will have enough power to drive them all, or you can just hook it up and keep unplugging phones until it works.  I have systems with six or so phones on each that work fine.

[Alternatively, you can abandon old-style land-line phones entirely and buy VoIP phones.  Doing so will give you access to many more features, but requires a wired internet connection everywhere you want a phone.  (WiFi VoIP phones are becoming available but are not yet widespread or cheap; they will be before long.)  For most people this approach is not practical for now.]

You’ll need a computer to set things up, but you won’t need to have a computer running to make or receive calls.

VoIP is not 100% reliable for faxing.  If you need to connect a fax machine, I’d suggest testing it before making a commitment.  It will work well enough for most people, but anyone who depends on reliable fax service may want to keep an old-style phone line to run their fax machine, or switch to an internet-based fax service.  

The Hardware
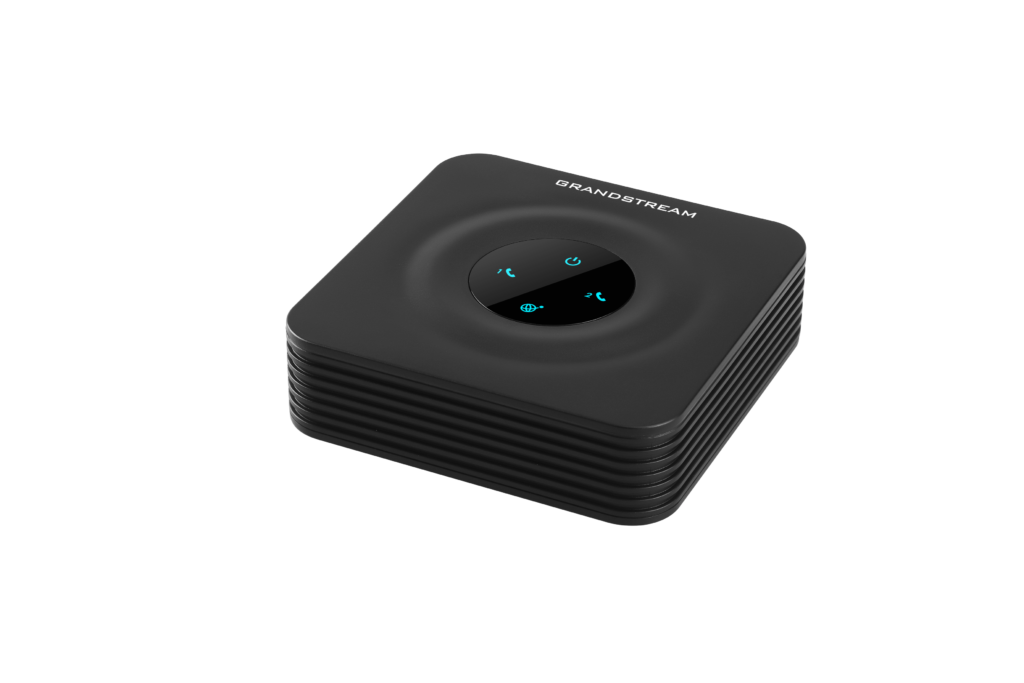
The Grandstream HT802 2-line ATA.

You’ll need an ATA (Analog Telephone Adapter) that lets you connect the phones in your house to the internet.  It’s a small box that costs $30 – $40.  Once you get it set up and working, you’ll probably forget you have it.

You need a location for the ATA that has access to a wired internet outlet, and access to the wired phone system in your house.  Probably where your router lives will be best.

I’ve had good luck with Grandstream ATAs.  You can get them from Amazon.  Grandstream has introduced new models of their ATA series (HT801/802), but the old models (HT701/702) are still somewhat available, especially on eBay, and are cheaper.  I will be describing how to set up the newer models but the older ones are similar enough that you should be able to follow along.  There is also a slightly lower-cost ATA available from Cisco, but I don’t have experience with it, and this article won’t describe how to set it up.

You can get ATAs that support one phone line or two (or more, but they get expensive real fast).  In this context, a “line” means the same as an old-style land-line: it has a phone number and you can plug a phone (or phones) into it.

The HT802 is probably the best choice for most people.  It supports two lines (you can just use one if you’d like), and is easy to set up and maintain.  If you’re absolutely sure you’re only ever going to want a single line, a one-line version is available for slightly less.

A note about warranties: Grandstream requires you to go through the dealer you purchased the item from in order to obtain warranty service.  I’d suggest asking the seller on Amazon if they will handle warranty claims for you; if not you don’t have a warranty.  These devices are quite reliable so your exposure is limited, but if it matters to you, check first.  Of course with Amazon you’ve got 30 days to return the item if you have trouble with it right off the bat.  I’ve never had one fail.

The VoIP Service

There are a number of bring-your-own-hardware VoIP providers out there.  I use Callcentric.  I’ve had good luck with them over the years, they have excellent support, and they are one of the lowest cost providers.

You can set up a phone line, with a new phone number, plus service plans for incoming and outgoing calls (they are separate), for about $5.  It doesn’t cost anything to cancel in case you try it and don’t like it.  You can probably end up keeping your old number; more about that later.

If you want to get started now, go here to set up an account with Callcentric.  Don’t order anything yet; we’ll go over your options first.

Things to Note About VoIP Services

First, incoming service and outgoing service are separate. You need both to replace an existing land-line. The incoming service is what’s associated with your phone number; the outgoing service knows your phone number too, to display Caller ID and to work with E911 service.

You also need plans for both incoming calls and outgoing calls. Start with pay-per-minute plans; you can upgrade later to unlimited plans for either or both.

You need to give Callcentric your credit card number. All calls are prepaid. When you sign up you put $5 in your account, which is then refilled with $20 any time it goes below $5. There are low limits on the number of refills per day and per month, so if somebody hacks your number and makes a lot of expensive international calls, your exposure is quite limited. Be aware that calls billed to your account, even fraudulent ones, are your responsibility; Callcentric doesn’t give refunds.

You can optionally add voicemail to your incoming line(s). You have to sign up for it but it doesn’t cost anything additional. I recommend doing so.

You need to set up E911 service on your outgoing line(s) so if you dial 911 they will have your address. You’ll get walked through the process when you sign up; be sure to follow all the steps as indicated and to check that you get an email saying that your E911 service is active. You don’t want to find out it’s not working when your house is on fire. Be aware that E911 services discourage “test” calls.

Start with a new phone number to use for testing, while keeping your old service and number. When you’re sure you want to commit, you can have your existing number “ported” to the new service.

Setting up your Callcentric Service

Presumably you’ve already signed up for an account; now add both incoming and outgoing pay-per-minute service. Spend some time looking through the Callcentric website, but don’t worry if much of it is confusing. We’ll explain what you need to know later on, and there’s much you don’t need to know.

At this point you’ll have an account name and password, a Callcentric account number which looks like a phone number with a “777” area code, and a new phone number. Write it all down and don’t lose it.

Next you need to create a default Callcentric extension. With the simple setup we’re discussing, you can forget about extensions and extension numbers; you’ll be using the default of extension 100.

Sign in to Callcentric and from the dashboard, pick “View/Modify extensions”. Pick “Add new extension”. Now fill in the options, most of which are self-explanatory. The extension number is 100, which is the default extension. The password is the most important — use a complex password (I recommend using an online password generator) and write it down. You’ll only need it once (in the next step) so it doesn’t have to be easy to remember so long as you have it written down.

I’d suggest not worrying about setting up voicemail at this point; it’s a bit complex and you don’t need it in a basic configuration.

When you’re done you’ll have one extension, which will be “unregistered” at this point because we haven’t yet set up the ATA. That’s next. Once the ATA is set up as described next, the status should change to “registered” which means that Callcentric is successfully talking to your ATA.

Setting up your ATA

Now that you have your ATA and a Callcentric account, you need to configure your ATA. This is without question the most complicated part of the process, but there’s little you need to know to do it successfully. There are hundreds of options to be set, but most of them can be left set to the default, and many of them don’t matter.

Callcentric has instructions on their website for setting up your ATA which can be found here. This is for the HT802 model ATA. There are also instructions for the HT702. If you have an HTx01 model the procedure is almost the same. All ATAs have pretty much the same set of options.

Two more things you should do are: upgrade the ATA’s firmware to the latest version, and change the default password for the ATA. Be sure to write down the password; I like to put it on a sticker on the ATA.

Once you get the ATA properly configured, the status on the website should change (in a minute or so) to “registered”. Your new phone system is live! As part of setting up your ATA you should have connected a land-line phone to your ATA; pick up the phone and you should get a dial tone. You should be able to dial out (using the area code even with local numbers) as well as receive calls at your new number. Try both.

Hints: 1) you need to use “1” followed by the area code for all calls, 2) when dialing, press “#” after entering the number to speed things up, and 3) don’t pause for more than a few seconds while dialing or the ATA will try to dial what you’ve entered so far, it won’t go through, and you’ll have to start dialing from the beginning. That delay is one of the options in the ATA setup if it is too short for you.

In Case of Trouble

The unfortunate fact is that when doing something this complicated, it probably won’t work the first time. Your first step should be to go through the entire configuration process and double-check that everything is correct. Get one character wrong and it will fail.

The first thing to try is doing the whole ATA setup again, in case you did something wrong. This frequently gets things going, and it only takes a minute or two to try.

Callcentric has very good support and they should be able to talk you through finding and fixing what’s wrong. Note that their support is intended for people with experience in VoIP, but they seem to be very patient when dealing with beginners.

Callcentric support is accessed from their website and is ticket-based. They don’t have phone-based support (which seems odd for a phone company), but I’ve found that for complex problems they will initiate a call. They respond quickly to most tickets.

Grandstream also has good support, primarily through their user message boards. Find the ATA message board. Note that their message boards ask annoying questions when you first post. This is part of an attempt to limit spam, and it will stop after your first few successful posts.

You can also post a comment here. I’ll do what I can to help, but there will be periods during which I will be unable to respond.

Porting your Existing Number

If you want to keep your existing number, you can probably “port” it to your Callcentric number. It’s quite an involved process, but is well-described in the Callcentric support area. There is a charge for porting, around $20, but Callcentric often has specials where they will waive the fee.

Be aware that porting takes some time to be done; I’ve had it happen within hours of applying, but usually it takes a few days. You’ll get emails from Callcentric telling you what’s happening and when they have a tentative date and time they will let you know.

When the port is accomplished, your existing phone service will stop working and you’ll have to begin using the new Callcentric service for all incoming and outgoing calls.

I strongly suggest that you experiment with the Callcentric service for a few weeks to be sure that it will work for you. Porting can’t be “undone”; if you decide you want to leave Callcentric you’ll have to initiate a new “port” from whoever you want to switch (back) to.

Cutting Over to your New VoIP Service

When you’re ready to switch to VoIP for good, simply unplug the phone wire from your old provider’s equipment and plug it into your new ATA. Everything should then work pretty much like it always did, but you’ll be using your new VoIP service.

If you’re not porting your old number or are starting service in a new location, you’ll be using your new Callcentric phone number. If you are porting, it’s best to make the cutover at the time the port occurs.

Be VERY SURE that you have disconnected the old phone service before plugging your phone wiring into the ATA. If both are connected simultaneously, bad things could happen, including blowing up your ATA. Everything will be ok if you are using the phone wire that used to be plugged into a cable modem or a phone company demarcation point, but if the ATA is in a different location, it’s easy to accidentally have both sources connected at once. Don’t do it. Disconnect the old phone service BEFORE connecting the new. Be aware that if you’ve canceled your old phone provider’s service and your dial tone has gone away, you are still connected to their network. Physically disconnect from it. Sometimes this requires disconnecting or cutting wires.

Note that you can connect to your existing wired phone system at any extension; it doesn’t have to be at the same place the old phone service was connected. That location is usually determined by where the phone wire comes into your house; the new location is determined by wherever you locate your ATA. Just be sure you disconnect from the old service first.

Fancy Stuff You Can Do

Once you’ve got your VoIP service set up, there are lots of things you can do, and a few you can’t:

  • You have to always dial the area code, including the leading “1”. There are fancy ways to eliminate this need, but until you get some more experience with VoIP (a lot more) you don’t want to go there.
  • Don’t forget that you can speed up connections by dialing “#” after the number.
  • There’s no operator. Dialing “0” gets you nowhere.
  • Callcentric has “411” information service. It doesn’t cost extra (just your regular outgoing call rate) but does have ads.
  • You can enable or disable international calling. Check to see if it is enabled for you, and disable it if you don’t expect to make such calls. International rates can be looked up on the Callcentric website, but for most countries they are very cheap. You can look up rates here.
  • You can use a softphone app on your smartphone to connect to your Callcentric account. This lets you make and receive calls on your home number from anywhere you have an internet connection. Your smartphone is just another extension of your home phone. This is great for traveling, and works anywhere in the world.
  • Callcentric has spam filtering to reduce the number of unwanted calls. I’ve found that it doesn’t block all of them but helps some. You can also filter calls by doing things like requiring callers to press a specific key to be connected. All this is explained on the Callcentric website here.
  • If you want to create a mixed system with some VoIP phones and some phones connected to an ATA, you can do this. It’s a good way to slowly switch over to a pure VoIP phone system.
  • Don’t forget to set up voicemail, even if you have an answering machine at home. In that case it will provide a backup so callers can leave messages even if your home phones are down due to a power or internet failure. All about Callcentric voicemail is here.
  • You should also check and set up your Caller ID and CNAM (the name associated with your Caller ID. Instructions are here.
  • Callcentric lets you have multiple numbers on your account, even (low-cost) 800 numbers, and have them all ring on your phone.
  • Callcentric can supply a number to be used for receiving faxes and will email a PDF of any faxes you receive at such a number. See here.

Saving Money for Sodastream Users: Sodamix

Part 2: Making Your Own Sodamix

The first post in this series tells how to avoid having to buy or refill the expensive Sodastream CO2 carbonation cylinders. This second post will introduce various ways to make your own sodamix, so you don’t have to buy that from Sodastream either.

Sodamix is the syrup you add to seltzer to make soda. Sodastream bottled flavors are a form of sodamix.

There are several good articles on this subject, which you can find by searching, and which are written by people who are as obsessive about this kind of stuff as I am. Much of what I present here came from that information. But I also learned a lot myself along the way.

What You Need to Get Started

There are some things you’ll need right away. I’d suggest just buying the ones you don’t already have. They’re not expensive.

Dispenser bottles: I started out using the original Sodastream sodamix bottles to bottle my own. I quickly learned that they are just too small to bother with. I found quart squeeze bottles like restaurant kitchens use work very well. I started with six, which has turned out to be a good number. Amazon has lots of them for a couple of bucks each. I got mine from US Plastic, item number 60147. These are also a couple of bucks once you add shipping. The bottles have little red caps that get lost. Just throw them out.

Utensils: you’ll need a container, a funnel, and a spoon. I use a beaker for a container, but any glass or plastic measuring cup will do. If you don’t have an appropriate-sized funnel, just buy a set of them.

Digital scale: you need a good one, that reads to .01 gram and goes up to 500 grams or more. These are dirt cheap on Amazon or eBay; figure about $15. Buy one. Be sure it has a “tare” function; I think they all do.

An Overview of the Process

The key ingredient in making your own sodamix is flavor concentrate. This is very, very concentrated flavor, without any sweetening added. I buy it from a company called Rio Syrups, but they aren’t set up for retail sales and sell in large quantities, so I buy it in bulk, rebottle it in pints, and sell it on eBay. A pint of concentrate will make about a gallon of sodamix, which in turn will make a whole lot of soda, 64 or more liters depending on how strong you like it.

I’m also selling 2-oz sample bottles of flavor concentrate on eBay. If you just want to see if making your own sodamix is something you want to do, or to try out one of the flavors, it’s a cheap way to do so. The sample-size bottles make about a pint of sodamix (roughly equal to one bottle of Sodastream flavors), which in turn makes about 8 liters of soda.

You’ll also need sweetener. If you don’t mind the calories (and the diabetes), you can use sugar. I prefer diet soda and use artificial sweetener. I’ve tried a number of combinations, and have settled on a mix consisting primarily of stevia, since it seems to have the fewest people saying it’s bad for you, and my mix tastes to me just like sugar.

Lastly, you’ll need a bit of preservatives. Sodamix will get moldy if you don’t use it. If you look at the ingredients Sodastream uses, preservatives are in there too. I’ve settled on a little citric acid and a tiny bit of sodium benzoate. I don’t refrigerate my home-made sodamix with the preservatives in there. If you choose to avoid preservatives, you’ll have to refrigerate it.

Once you get set up to make sodamix, you measure out the ingredients in grams using the scale, which gets reset to zero after adding each ingredient using the tare function. Then dump everything in a quart bottle using the funnel. Rinse your mixing container several times with hot water and dump that in too, to be sure to get everything. Shake well, fill the rest of the way with cold water, and you’re done: a quart of freshly-made sodamix. It only takes me a minute or two to make a bottle.

[Note: I also include traditional kitchen measurements in my recipe, but recommend that you go by weight instead. It’s more accurate, and much easier using your scale’s tare function.]

A note about concentrations and dilutions: there is much variation in how strong your sodamix is, and how much you use in a liter of soda. I started out trying to make everything come out the same strength as Sodastream’s sodamix, and I think what I’ve come up with is pretty close. But you can vary the quantities of the various ingredients quite a bit to get soda as strong or as sweet as you’d like. Treat these recipes as a starting point. I personally make sodamix about 25% stronger than the recipe listed below so I don’t have to make it so often. Also, don’t be too fussy about quantities as you measure things — being off quite a bit is fine.

Note that flavor concentrate is very concentrated, and also quite expensive. It costs me as much as $85 a gallon, so I have to charge quite a bit for what I sell. I don’t make much on it. It’s also heavy, which makes shipping expensive. If you look at my eBay listings, notice that there are quantity discounts, and a substantial combined shipping discount. You can save a lot by buying more than one.

Preservatives

I use two common preservatives to keep the sodamix from getting moldy: citric acid and sodium benzoate. Both are readily available from Amazon or eBay, in packages much bigger than you need. Citric acid is pretty innocuous but sodium benzoate might be objectionable to you; leave it out if you prefer, but if you do so keep your sodamix in the refrigerator.

For a quart of sodamix I use 0.5 gram of sodium benzoate, and 2 grams of citric acid. It’s not much but it does the trick. It comes out to about 11mg of sodium benzoate and 22mg of citric acid per 12-oz serving.

I suggest using citric acid even if you want to avoid preservatives as it also contributes to the flavor of the sodamix.

Sweetening With Sugar

If you prefer sweetening with sugar, use about 610 grams (3 cups) of sugar to a quart of sodamix. That’s a lot of sugar, well over a pound.

I’ve never tried mixing up sugar-based sodamix, so I don’t know how hard it is to make. It’s probably best to put the sugar in the bottle first, then measure out the rest of the ingredients and add them before adding water. It might not be easy to get that much sugar to dissolve. Using hot water would help.

Sweetening Without Sugar

I went through quite a few variations before settling on a stevia/erythritol blend. Stevia by itself is extraordinarily sweet but has a somewhat unpleasant aftertaste. Adding a bit of erythritol kills the aftertaste and makes it taste (to me at least) just like sugar. Erythritol is a sugar alcohol and occurs naturally in some foods.

There are many stevia blends available (often with erythritol), but what we want is pure stevia for our sodamix. It’s a little hard to find but you can get it in liquid form and in powder form from Amazon or eBay. I like to use a combination of both liquid and powdered stevia. I’ve found that 3.5 grams of powdered stevia, 9.5 grams of liquid stevia, and 12 grams of erythritol make a good combination for a quart of sodamix.

I prefer to use stevia as I think it’s healthier than other artificial sweeteners like sucralose, which is what Sodastream uses. But using sucralose is cheaper and if you don’t object to it, here’s how: use 2g of acesulfame potassium (Ace-K) plus 10g of pure liquid sucralose instead of the stevia and erythritol. The Ace-K makes it taste better and is in Sodastream’s recipe too.

The Diet Sodamix Recipe

Now let’s put it all together. To make a quart of diet sodamix, use the following ingredients along with enough water to make a quart:

Weightvolumeingredient
0.5 gscant 1/4 tspsodium benzoate
2.0 g1/2 tspcitric acid
12 g4 tsperythritol
3.5 g1-1/2 tspstevia powder
9.5 g1 tbspstevia liquid
130 g1/2 cupflavor concentrate
Sugar-Free Sodamix Recipe

When measuring flavor concentrate (or adding sodamix to your soda), be sure to shake it well first. Actually I forget about half the time and it doesn’t seem to matter. But the label says to shake it, so I’m passing on that suggestion. Some of the concentrate flavors, like the colas, separate on standing which looks terrible. They haven’t gone bad, just shake well to recombine them.

Using the recommended quart squeeze bottle for the sodamix, I like to use three to four squeezes of sodamix per liter of soda — that’s an ounce and a half up to three ounces. If you like your soda light, use less; if you like it strong and sweet (like bottled soda) use more.

Enjoy!

Flavor Concentrates

As mentioned earlier, flavor concentrates are not readily available in quantities suitable for home use, so I’ve decided to buy them in bulk and rebottle them in pints. A pint of concentrate will make about four quarts of sodamix. A quart of sodamix in turn makes maybe 16 liters of soda. So a pint of concentrate will last you quite a long time.

There are literally hundreds of varieties of flavor concentrate available. Some are great and some not so much, and I’m selling only the ones I like. If you want a flavor not listed, let me know and I’ll try it, and add it if it’s decent. I’ll also be adding ones I’ve tried and liked.

One of the flavors I offer is called Dr Rio, and it’s supposed to be a knock-off of Dr Pepper. It’s pretty good, but it’s not much like the original. If you’re looking for something that tastes like Dr Pepper, do try Dr Rio. You’ll probably like it even though it’s not very close.

I’ve been adding some of the other ingredients, individually and in kits, as well as supplies like sodamix bottles, to my eBay store.

My Sodamix Supplies on eBay

I sell ingredients individually and in kits. You can get everything but the flavor concentrates on Amazon, but in package sizes much larger than what you need. My ingredients and kits are cheaper and more convenient. If you add them to an order they won’t usually increase the shipping cost. The flavor concentrate bottles will make 8 quarts of sodamix (80 to 120 liters of soda), other ingredients are sized to make 25 or 50 quarts of sodamix.

This stuff is expensive, especially when you add shipping. But do the math and it’s still cheaper than Sodastream flavors. I’m charging very little above my cost, and shipping is flat-rate. As noted above, there are very significant quantity discounts on multiple items, both for price and for shipping.


Saving Money for Sodastream Users: CO2

Part 1: Using Your Own CO2 Gas

Many years ago I bought a Sodastream machine to make soda. I figured I’d save some money, and save having to lug bottles home and return them for the deposit. I drink a lot of soda.

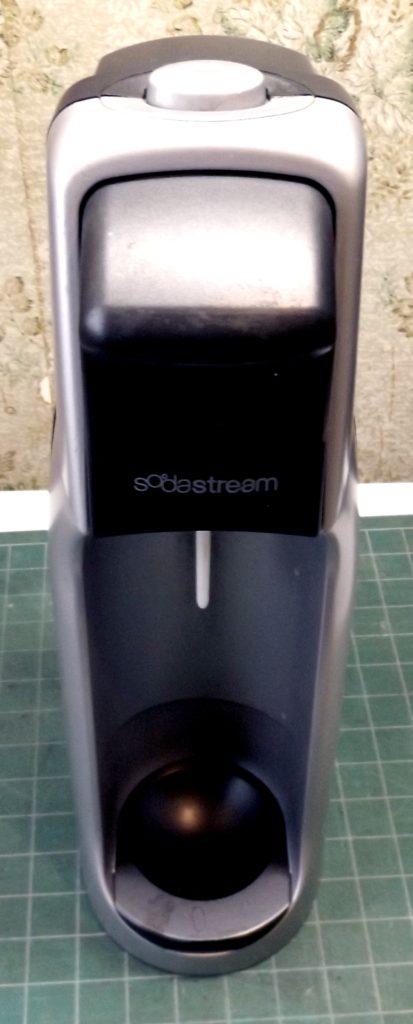
My Sodastream Machine

Well, it worked out great, with one exception: it wasn’t cheap. I went a few years using Sodastream’s CO2 bottles and sodamix, annoyed by having to spend hundreds of dollars a year on it, to say nothing of the inconvenience of having to return CO2 bottles to the mall which is ten miles away.

So I started exploring alternatives. First was buying a few paintball tanks for CO2, and an adapter that converts paintball-tank threads to Sodastream threads. I found a local sports shop that would fill the paintball tanks for a few bucks, and I was in business.

Everything was great until the sports shop stopped filling CO2 bottles, and I couldn’t find anyone else to do it anywhere nearby. I was back to spending $30 to refill a couple of Sodastream cylinders every couple of weeks.

The next step was to buy a big tank that I could use to fill my paintball tanks myself. You can also get an adapter hose to connect a big tank directly to the Sodastream machine, but I didn’t like that idea, mostly because it seemed awkward. So I bought a big aluminum tank, and another adapter, this one to connect to the big tank, with a hose to connect to a paintball tank, and a couple of valves. It was all pretty expensive, but it doesn’t take long to make back that money with your savings.

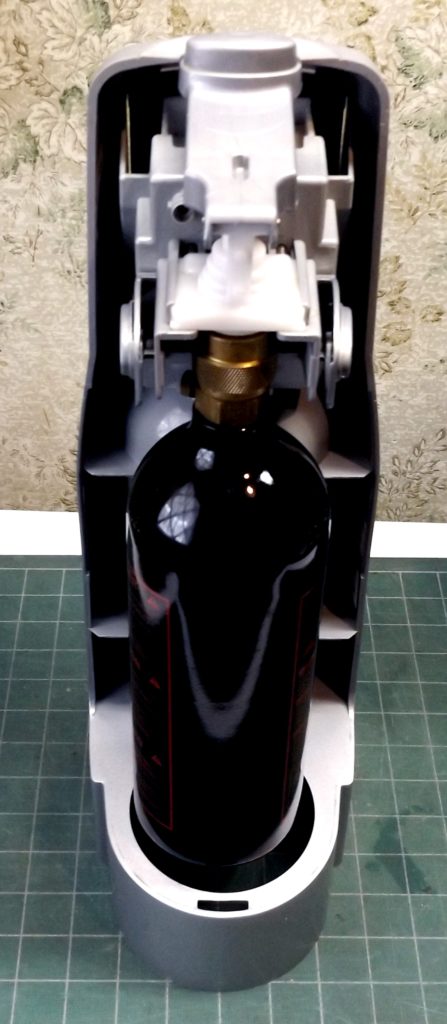
Paintball tank installed in Sodastream machine

Now I pay about $25 to fill the big tank, and it lasts a year. I have three paintball tanks, which I have to refill about once a month.

So that’s the story. The rest of this post tells how to do it yourself. Another post tells how to make your own sodamix, which frees you from having to buy those expensive flavor syrup bottles from Sodastream.

Starting with Paintball Tanks
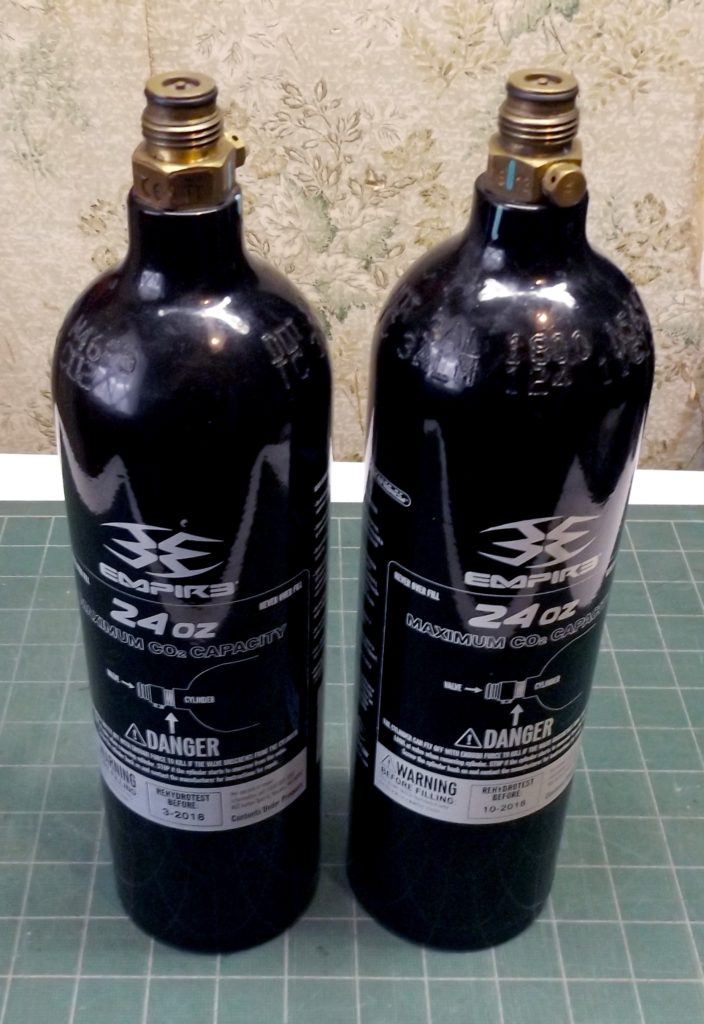
24 oz paintball tanks

You want to get 24 oz paintball tanks. That’s the biggest size that will fit in the machine.

Warning: there are many models of Sodastream machines, and I don’t know if they all take the big Sodastream cylinders, or even if Sodastream still makes the big cylinders. Look at your machine and see if the space where the Sodastream cylinder goes is big enough for a paintball cylinder, which is about 3-1/8″ in diameter. If not, I can’t help you (for now…). But you might consider one of the direct-to-big-tank hoses.

Right now 24 oz paintball tanks are about $25 on Amazon and eBay has them for 2/$45. I suggest starting with two of them.

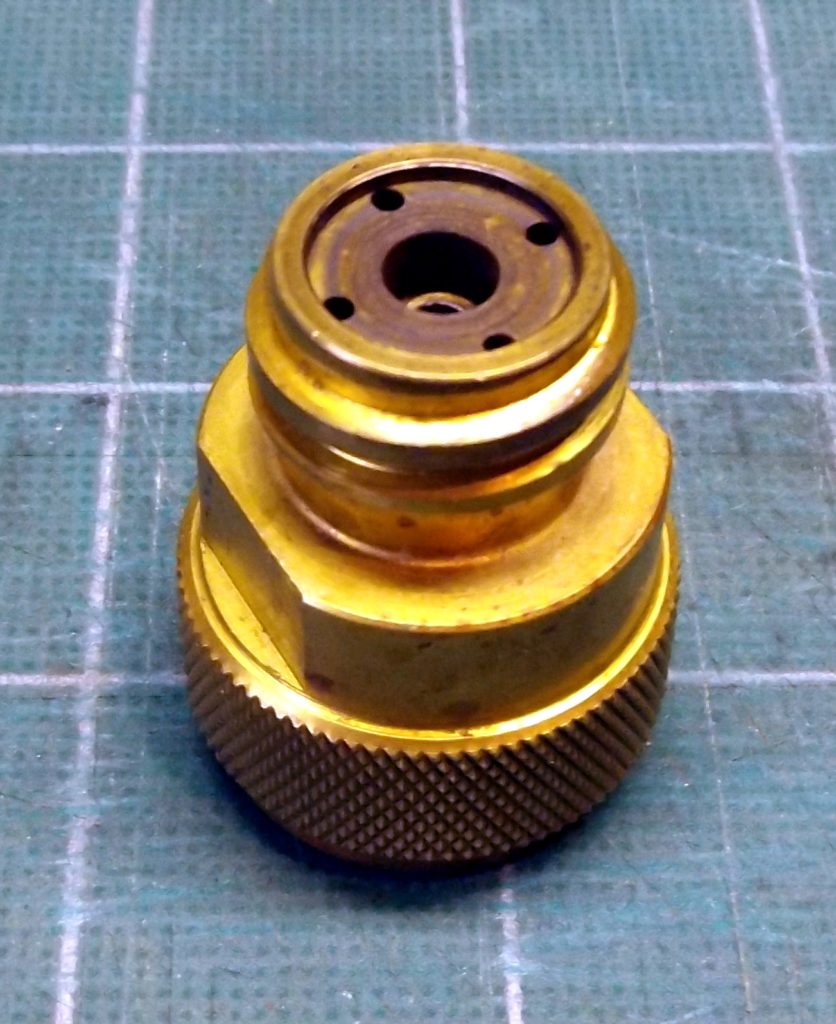
Adapter

The adapter you need is $15 – $20 on Amazon, and $12 – $16 on eBay. Get one that comes with an Allen wrench.

Note that the paintball tanks use an o-ring for a seal. I’ve had trouble with them leaking. I sell oversize o-rings for paintball tanks on eBay. If you have trouble with leaks, try those.


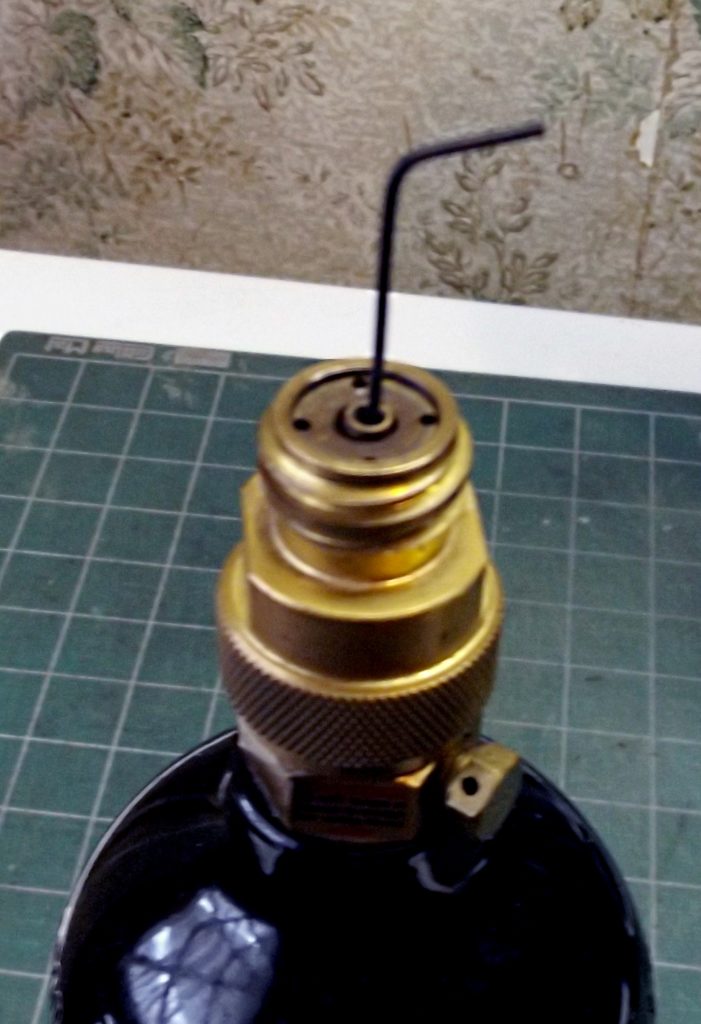
You need to adjust the adapter after installing it on a paintball tank but before mounting it on your Sodastream machine. Use the little Allen wrench that came with the adapter. Stick it in the top of the adapter and engage it with the adjusting screw. Tighten the screw until gas escapes, then back it off a bit. If you ever push the button on the Sodastream machine and little or no gas comes out (but the tank isn’t empty) you need to perform this adjustment again.

Adjusting adapter valve
Getting Paintball Tanks Filled

Some sports shops can fill paintball tanks for you. The chains typically don’t. Don’t worry about getting “pure” food-quality CO2 — it’s all pure. There are endless threads on message boards about this. It is people worrying about nothing. Expect to pay $3 – $5 for a fill.

Like me, you’ll probably have trouble finding a convenient place to get this done. That’s why I recommend biting the bullet and getting your own large-size CO2 cylinder. It’s a big investment but you’ll make back your money pretty fast.

About CO2

Here would be a good place to tell you about CO2 — you need to know the basics to understand what you’ll be doing.

CO2 isn’t like most compressed gasses. When the pressure reaches about 700 lbs it condenses into a liquid, and the liquid form holds way more CO2 than the gas form. You want to be working with the liquid form. CO2 cylinders are rated by their capacity of liquid by weight. A 24-oz paintball tank holds a pound and a half, and a 20-lb cylinder holds, well, 20 lbs. You’re not supposed to overfill the tanks, which means weighing them as you fill them. I’ve never bothered, and never had a problem. The only problem I’ve seen is that it’s hard to get the full weight into a tank.

Because CO2 is a liquid, you need something called a “siphon tube” in your big tank so the paintball tanks will get filled with liquid sucked from the bottom of the tank. Without a siphon tube you’d just end up filling the paintball tank with 700 psi of gas, which isn’t much gas.

When your big tank starts to run out you’ll be getting mostly gas out of it. When you fill your paintball tanks you’ll still be getting 700 lbs of pressure but since you won’t be getting any liquid, the tank will only last for a handful of bottles of soda in your machine. It’s time to get more CO2.

At this point an option would be to use a direct connection from the tank to the Sodastream machine. This lets you use all the CO2 you paid for. More about this later.

It’s important to empty all the gas out of an “empty” tank before refilling it. This goes for paintball tanks and the big tank. You’re only going to be filling it until it get to 700 lbs, and you want the full 700 lbs worth of liquid CO2. If the tank still has 600 lbs of gas in it when you refill it, you won’t get much liquid before it’s “full”.

Be somewhat careful when releasing CO2 to get the tank completely empty. If you do it in a closed space you can die from lack of oxygen. I’ve had the pilot lights on my stove go out after emptying out a big tank in my kitchen. That’s getting pretty well into the danger zone. Now I always empty out the big tank outside.

A note about CO2 and climate change: the CO2 you buy was removed from the atmosphere, and when you use it it goes back into the atmosphere. The net gain of CO2 is zero. Of course like everything else it takes energy to “make” CO2 and that energy likely comes from fossil fuels, but let’s not go there.

Setting Up to Fill Your Own Paintball Tanks

To fill your own paintball tanks, you need a commercial-sized tank, and an adapter.

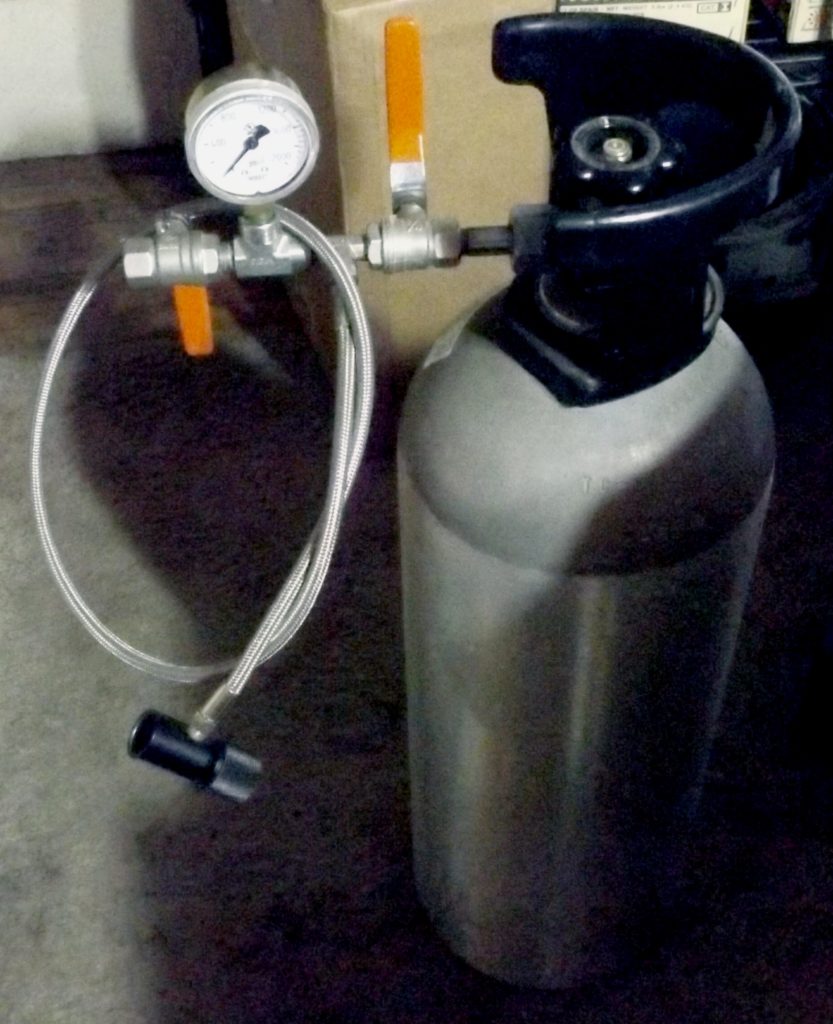
CO2 cylinder with “fill-station” adapter

You can then get your tank filled at any compressed-gas place. There are lots of them, often with “welding supply” in the name. Expect to pay about $25 to get a tank filled. Some places will do it while you wait, some want you to come back later to pick it up. The sizes of tanks that you’ll be dealing with get refilled, and you get the same tank back; they aren’t done on an exchange basis like the really big tanks.

I recommend a 20-lb-capacity aluminum tank. It’s a nice size and not too heavy. You want one that has a standard CGA320 valve and a siphon tube. (A siphon tube sucks the liquid CO2 out of the bottom of the tank — without one you’ll end up filling your paintball tanks with (not much) CO2 gas.) I bought mine from http://www.beveragelements.com, and recommend them. A new 20-lb aluminum tank with a siphon tube costs $126 plus shipping; they also sell on eBay and have the same thing for $139.90 with free shipping. Sounds like a lot? It’s cheaper than ten Sodastream tank refills, and how long would it take you to go through that many?

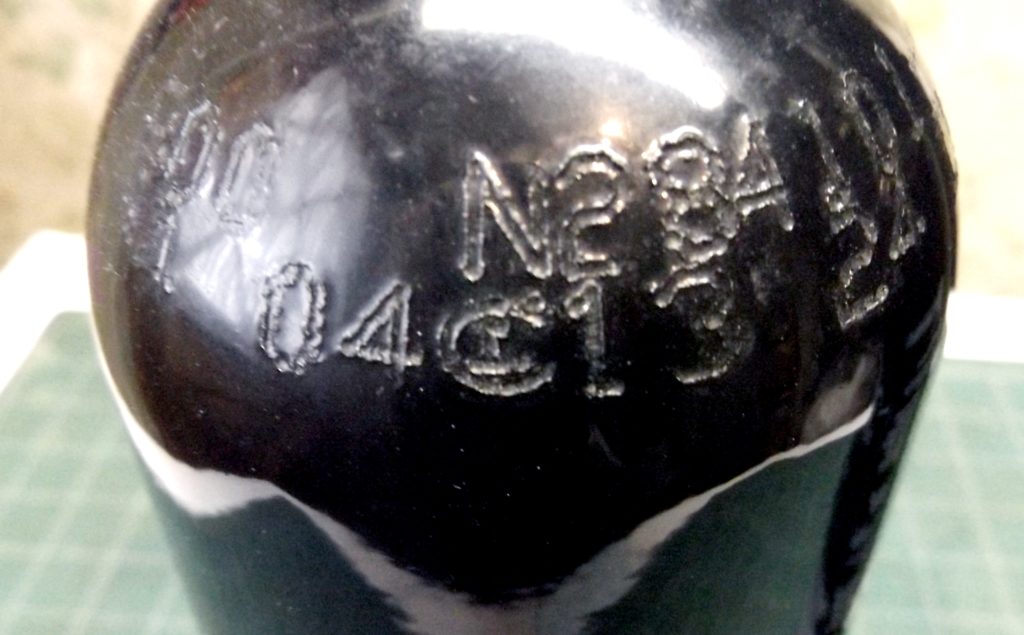
This tank was last tested in April 2013, and certification expired in April 2018.

A note about cylinders (tanks) and pressure testing. Tanks (including paintball tanks) have a date stamped on them — a two digit month and a two digit year, separated by some sort of symbol. The date is when the cylinder was last pressure tested. It is “good” for five years from that date, after which it is supposed to be recertified. If the cylinder certification has expired, the gas place is supposed to refuse to refill it. I don’t know if they actually check, and I also don’t know how one goes about getting a cylinder recertified.

Certification testing (also called hydrotesting) is why I don’t recommend buying used cylinders. You’re likely to get a cylinder that has expired or is about to expire, and you then might have trouble getting it filled.

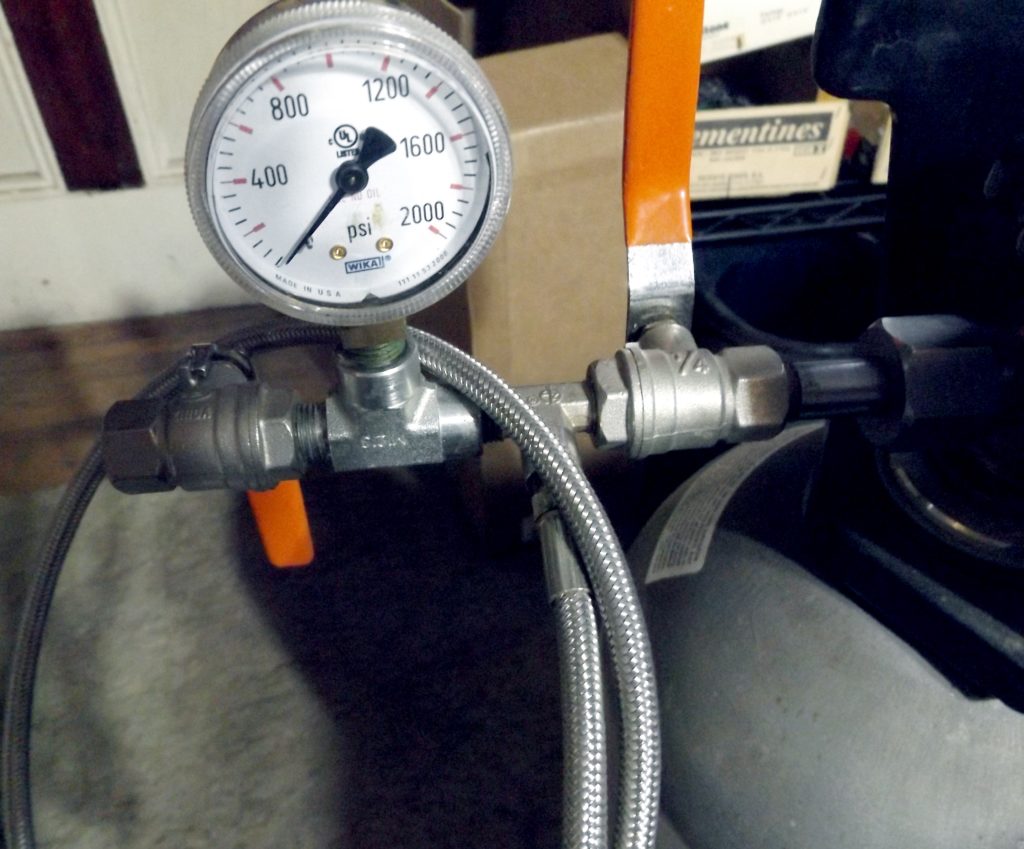
Paintball tank “fill station” adapter with added gauge

Now you’ve got a big tank full of CO2 and you need to be able to fill your paintball tanks. What you need is a paintball tank fill station. Search for that on eBay and you’ll find one — they start at about $30. You want something that fits on a CGA320 valve and has a hose connected to something that screws to a paintball tank. You don’t want anything made for scuba tanks.

Some “fill stations” have gauges; most don’t. You can add a gauge if you want. I think they help, even though they don’t tell you how much CO2 is left, until the liquid CO2 is gone. The fill station consists of valves and fittings, usually 1/4″ pipe thread. You can buy more fittings, and gauges, to add to it so long as they have the right threads. It’s most useful to have a gauge between the two valves.

A good source for the parts you need is McMaster-Carr. To add a gauge, buy one each of “0-2000 psi 2″ gauge” 32255K7, and “1/4″ high-pressure tee FxFxM” 50925K197. It should cost about $30 plus shipping. Once you get the parts, separate the fill station fittings in the right place and put it back together using Teflon tape.

Filling Paintball Tanks Step-by-Step
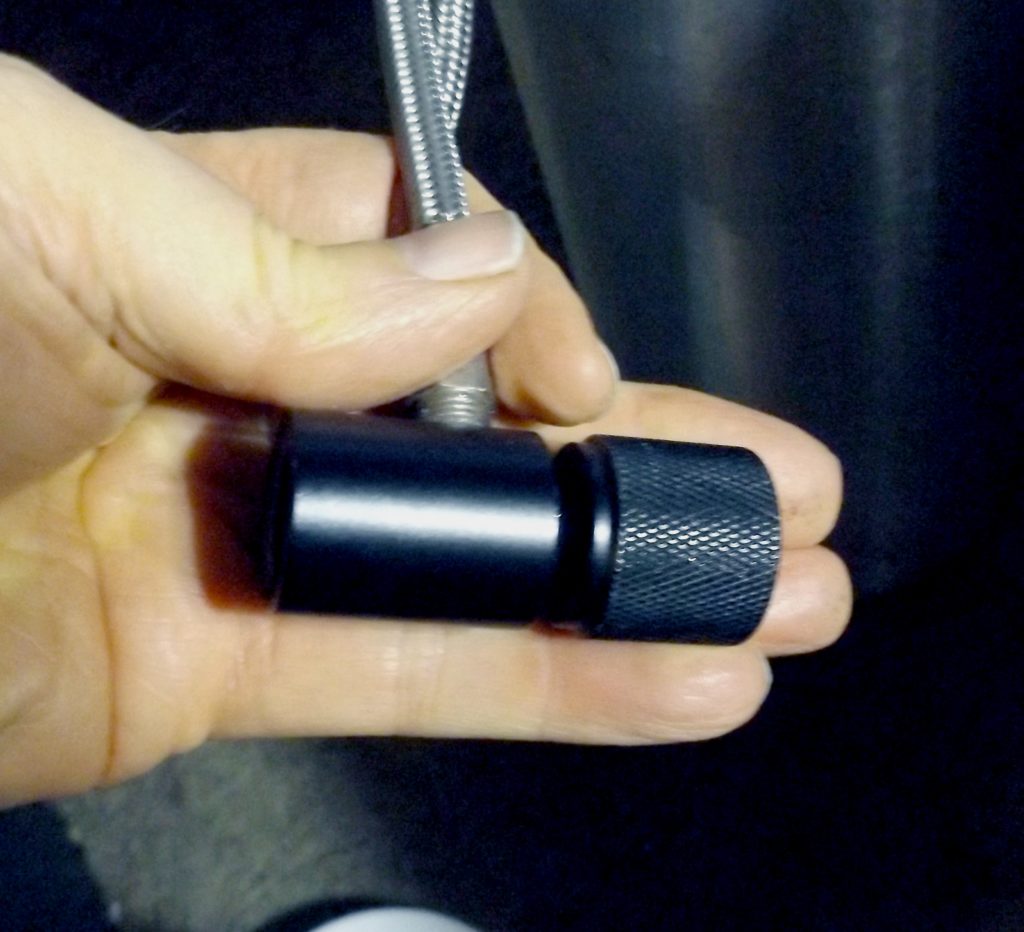
Fill station paintball tank adapter — connect your paintball tank to this. Knob opens paintball tank valve.

To fill a paintball tank, screw your adapter onto your CO2 cylinder, first making sure all the valves are closed. Open the main valve on the C02 cylinder, which shouldn’t make anything happen.

In the next step you will be screwing the paintball tank (which has brass threads) onto the adapter (which has aluminum threads). It is very easy to cross-thread the tank/adapter connection, which will ruin the adapter. The tank should screw onto the adapter smoothly. If it binds, even a little, back it off and try again,

Now that you have been suitably warned, screw a paintball tank onto the adapter at the end of the hose, and screw down the knob to open the valve on the paintball tank. Now, open the adapter valve furthest from the CO2 cylinder. That should let any CO2 left in the paintball tank escape. This is important because you want as much room for CO2 liquid as possible, to get a complete fill.

Close the valve you opened in the last step, and open the other adapter valve. Liquid CO2 should rush into the paintball tank. It will be cold and heavy. Wait until nothing more is happening, and wait another few seconds just to be sure. Close both adapter valves, then unscrew the valve on the paintball tank to seal the tank.

You’re almost done. Before unscrewing the paintball tank from the hose adapter, you need to let the remaining CO2 out of the hose. To do this, open the outer valve on the adapter and let the gas from the hose escape. There will be a lot. Finally, unscrew the paintball tank from the hose adapter, and you’re done.

It takes a lot less time to do than it does to explain.

Directly Connecting a Big Tank
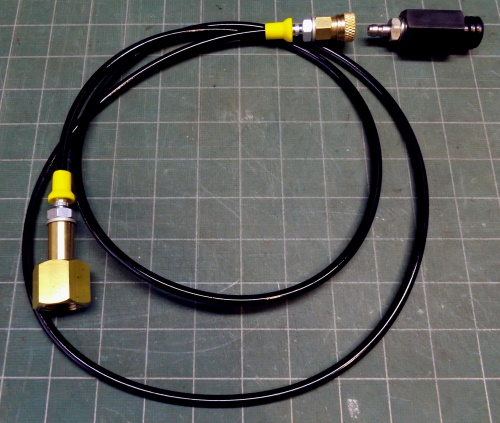
Hose to directly connect a big tank

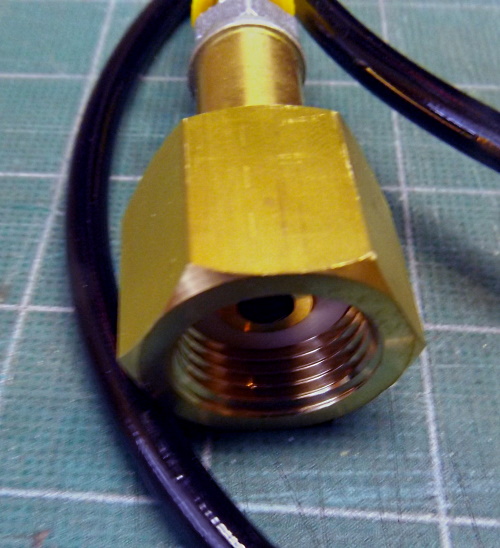
There is another kind of hose you can buy, which connects from your large CO2 tank directly to your Sodastream machine. This is useful for getting the rest of the CO2 out of your tank once you’ve used all the liquid CO2. The hose has a CGA320 connector on one end (to connect to your tank), and a fitting on the other end that srews into your Sodastream machine where you ordinarily attach Sodastream cylinders, or paintball tanks with a paintball tank adapter as described earlier.

It is also a way to connect a big tank to any Sodastream machine that doesn’t have room for a paintball tank, which I think is true of most newer machines.

Tank end of hose

If you want to skip the whole paintball-tank thing, you need a CO2 cylinder without a siphon tube. If you have a siphon tube in your tank, you’ll get liquid CO2 instead of gas, and that will not work. Remember: with a siphon tube you get liquid (until the liquid is gone), without one you get gas. The Sodastream machine wants gas.

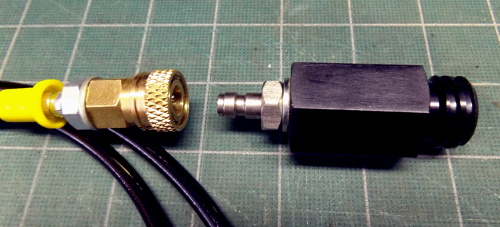
To find the hose you need, search on eBay for “sodastream co2 tank adapter hose”. You don’t want a “fill station” for this. Some of them have a quick-connect at the Sodastream end, which is very convenient. I paid about $25 for mine. Note: the quick-connect fitting uses tiny o-rings, which tend to come out. If they do, stuff them back in — there are two of them, one on top of the other. It’s hard to get them in place, but it can be done with some fussing.

Sodastream machine fitting with quick-connect

I’ve noticed that the o-rings tend to swell in use. Let them sit overnight and they’ll go in much more easily. If you lose the o-rings, they are 6mm ID and 10mm OD. You can get them from McMaster-Carr, item number 9262K166. Slightly smaller ones might go in more easily: order 9262K576.

So far I don’t have a lot of experience doing this, and it hasn’t been going well. The button in the Sodastream fitting that releases the gas appears to require a lot of CO2 pressure to activate. Under about 450 lbs you can’t get any CO2 out of it. Maybe there’s something wrong with my adapter, or maybe it’s just designed that way. In any case if you want one of these hoses to get the last bit of CO2 out of your tank, you may be disappointed.

Archiving Your Old Photos

Over the past year I’ve managed to scan most of my old photographs. Getting them digitized makes them easier to store and easier to share. If you have an automatic backup like Carbonite (as you should), your photos will be backed up in the cloud. Also, once they are scanned you can throw out the originals which saves space and avoids further fading or deterioration.

One of my projects was to scan close to a thousand old 35mm negatives that I had saved in a paper shopping bag from my high school days. I was the photography editor for the school newspaper and yearbook, and the bag was full of “outtakes”, but still contained many interesting things. You can see them here: http://bit.ly/BHS1968

I’ve found satisfactory ways of scanning most things. In this post I will describe what I have learned.

Scanning Photos

The most basic task in archiving is the scanning of photo prints. I’ve found that pretty much any desktop scanner will do the job. I use a Canon MX922 multifunction printer.

Just start scanning. Use a “Scanned Photos” folder to collect the unedited scans. I like to use a workflow of scanning, cleaning up the scans, editing the image’s metadata as needed, and moving the finished images to well-named folders.

If you have negatives for your prints, you may want to scan those instead. They are easier to scan, the quality may be better, and if you’re like me you’ve given away some of the prints but still have all the negatives. By scanning the negatives, you won’t miss out on the “good ones” that you gave away.


Scanning Slides and 35mm Negatives

For 35mm slides and negatives I bought a cheap standalone scanner from Amazon. There are quite a few available at a wide range of prices; the one I got was about $80 but is no longer being sold. The User’s Manual for it can be downloaded here: http://exeyesoftware.com/index.php/2017/12/28/miscellaneous-manuals-and-documentation/#dbtech

There are flatbed scanners that have attachments that will let you scan slides and negatives. I’ve never had any success using them, and don’t recommend that you try.

Read the specs and choose a film scanner that will handle the sizes of film that you have. Typically the scanners will accept slides and 35mm negatives (and maybe additional sizes), and will save the scanned images on an SD card. Once you figure out how to work it you can go through a big pile of negatives and slides pretty quickly.

Some scanners will also scan prints. I haven’t used one that does that, but you might want to consider that option. It looks like it’s limited to the more expensive scanners. Just remember that sending your boxes of photos off to a scanning service will cost hundreds of dollars, maybe thousands.

If you are scanning negatives they will typically slide through a plastic holder in the scanner. Be very careful to avoid getting dirt into the scanner as it will scratch both the plastic holder and the negative. You’ll probably want to buy a few spare holders and replace them when scratches get objectionable.

The scanner should have settings for scanning both negatives, and positive images such as slides. It also may let you select black and white or color, but it’s best to just scan everything in color. No matter the source, the resulting image file should be a positive image.

When scanning film or slides, be careful not to scan things so that the result is a mirror image. It’s sometimes hard to tell. Look for pictures with writing in them, like signs. Once you have figured out which way is right, note which side the emulsion (less-shiny) side is, and always scan things oriented that way. If you end up with a bunch of scans done wrong, you can fix them in editing.

Scanning Photo Albums and Scrapbooks

You may have photos mounted in albums that you want to preserve. The easiest way to do this is to remove the pictures from the album to scan them. If this isn’t practical, you can try to scan the album pages, in parts if they are too big, and then extract the individual photos during editing.

Scrapbooks are especially difficult, because they are usually too big to fit on a standard scanner. If I had to scan a scrapbook I would try to set up a stand that would hold a good camera exactly square above a flat surface, and take pictures of the pages. This has to be done precisely or the results will not be satisfactory. As an alternative you may wish to have a professional scanning service do your scrapbooks; it’s not cheap but may well be worth it. A typical price would be $150 for a 60-page scrapbook.

Photo Editing

The scanned images you generate will probably not be the best quality. Being able to clean up faded or poorly-exposed photos is one of the great advantages of digitizing.

To edit photos you can use any of a wide variety of photo editing applications. I use one called paint.net which is free and quite powerful. If you want more sophisticated control over things like colors, at the cost of a more complex interface, try Picture Window Pro. It’s also free, and worth checking out.

You may think you need to use Photoshop for this. By all means use it if you have it and know how to use it. But getting good at using Photoshop can take years. I doubt you want to make that kind of commitment, and you don’t have to.

Use the following steps to clean up a photo:

  • If the image is badly skewed, rotate it to appear vertical
  • If the image is oriented wrong and/or mirrored, correct the orientation
  • crop the image to get rid of borders and improve framing
  • try “Auto-Level” to see if it helps more than hurts; undo it if not
  • adjust brightness and contrast
  • sometimes “Sharpen” helps

These steps are quick to do and some can usually be skipped — in most cases you’ll only spend 20 seconds or so on a picture, and will end up with a much improved image. Once done, save the image back to the same file.

Getting Organized

Figure out a hierarchy of folders to give your picture library some sense of organization. It won’t be perfect but the goal should be to be able to find things relatively easily. Be sure to include things like dates and places. For example, often a set of photos will have a year printed on the back. That should be in the folder name for the pictures either directly or by hierarchy.

I don’t try to change the file name from the coded name generated by the camera or scanner. It’s just too much work.

Metadata

Photo files have hidden coding called “metadata”, some generated by the scanner or camera, and some that you can add. There are programs that let you edit metadata, but I just use Windows: right-click on the photo file, pick “Properties, then pick Details. That’s the metadata.

I use the Title, Subject, Tags, and Comments fields, when appropriate, to record things I know about a picture or that are written on the back. Most photos files I generate don’t end up with metadata because the folder organization tells everything I know about the picture.

You can go really overboard with Tags. They provide a way to code details like peoples’ names, places, events, and such. Some programs let you search for photos by tag. I, however, don’t use them.

There are date fields in the metadata. But, at least with Windows, you have to specify a complete date like 1/28/2019, not just a year or a month and year. This greatly limits its usefulness.

Scanning Services

Sometimes you have negatives you can’t scan yourself, such as odd film sizes. Or perhaps you have important slides or negatives that you’d rather have done by professionals. There are many places to get this done, including the chain drug stores. What you’ll find out first is that getting this done is very expensive, and the prices vary widely.

I’ve had good luck with a mail-order service called Spartan Photo Center in South Carolina. They are reasonably priced (though you’ll still pay a fortune), and have done good work the few times I’ve used them. The only drawback is a rather complex pricing model, and a corresponding order form that will remind you of doing your taxes.

Throwing Out Your Originals

You will probably be inclined to save the original prints, slides, and negatives. By all means save a few of the most important ones, especially when having the originals has some meaning to you. But you really don’t have to save much.

Remember that you can easily make prints of your digitized photos, that are probably much better than the originals (thanks to your editing), using your printer. Buy some photo paper (look on eBay for a decent price) and get in the habit of making prints to share.

Once you get used to the idea of keeping your valuable photos in digital form, the hard copies stop being so important. Just toss them.

Backup, Archival Storage, and Distribution

The library you create should be something that gets preserved for many years. Make backup copies on DVDs, USB memory sticks, and portable hard drives. Review your backup method from time to time to make sure they stay in a readable form as technology advances. Using a cloud backup service preserves things even if you have a fire or other disaster.

You may wish to upload all your photos to one of the various photo-sharing sites. These are good for short-term sharing, but can’t be depended on to preserve photos for generations. Too many have been bought out or shut down to consider them a viable archival method.

The library of photos you create is something you can share. Send copies of the entire library, on a DVD or USB memory stick, to all your relatives. The more copies that are out there, the more likely that one will survive for generations.

Don’t forget that your photos may have value to others. Consider sending copies to appropriate organizations such as local historical societies, libraries, and such. Often old photos include buildings with historical interest, or even just what a neighborhood used to look like decades ago. Even people who may not know who you are may find elements of your family pictures of interest many years in the future.

Canon MX922 Printhead Cleaning

I’ve been using (and selling) Canon MX922 inkjet multifunction printers for a long time and very much like them.  They do pretty much everything, and I’ve seen them on sale for $49 (a couple of years ago).   If you use them with non-OEM ink, you can get your cost per page down to pretty much the cost of the paper.

Unfortunately the MX922 has been discontinued.  I’ve done a lot of searching and haven’t found a reasonable replacement. at any price, from any manufacturer.  There are new and used ones for sale on eBay and other places, but you’re likely to pay over $300 for one (as of mid-2021).  It’s a measure of how good these printers are, and why it’s worth considerable effort and expense to keep them running.

I don’t know if non-OEM ink can cause problems, but I use it exclusively with good results.  You may have trouble with colors being a bit off when printing on photo paper.  You also may end up with a clogged printhead, which is what this post is about.  I don’t know if I would have had the same trouble if I used Canon ink, but from what I read online, you will end up with a clogged printhead eventually no matter what ink you use.

This post really needs some pictures but I’m not that motivated right now.  Maybe someday…

The Symptoms

Your printhead is clogged if there are problems visible on a nozzle check print, and running the printhead cleaning and deep cleaning routines don’t solve the problem, or only solve it for a short time.

If you’re having double printing, see the end of this post.

What To Do

When this happens you can buy a new printer, they’re cheap after all (at least they used to be), or you can buy a new printhead, which used to cost as much or more than a new printer but now looks like a good deal if you can find one.  Or you can try to clean the printhead.  It’s messy and takes a while, and you risk damaging the printer, but the printer is close to worthless at this point anyhow.

Update:  as of July 2021, printheads are very cheap and very available on eBay.  It looks like somebody made a non-OEM version, and they are closing them out for around $25 or $30.  I would recommend buying a couple if you want to keep your printer working for a long time.  It also changes the economics of cleaning them — you have to ask whether it’s worth $30 to have to go through the trouble of cleaning the old one.

I got my cheap printheads from China, installed one, and it works! The nozzle check pattern isn’t quite perfect (faint unevenness in the small-ink-tank black), but for normal use it prints just fine. I recommend these printheads!

Get Some Supplies

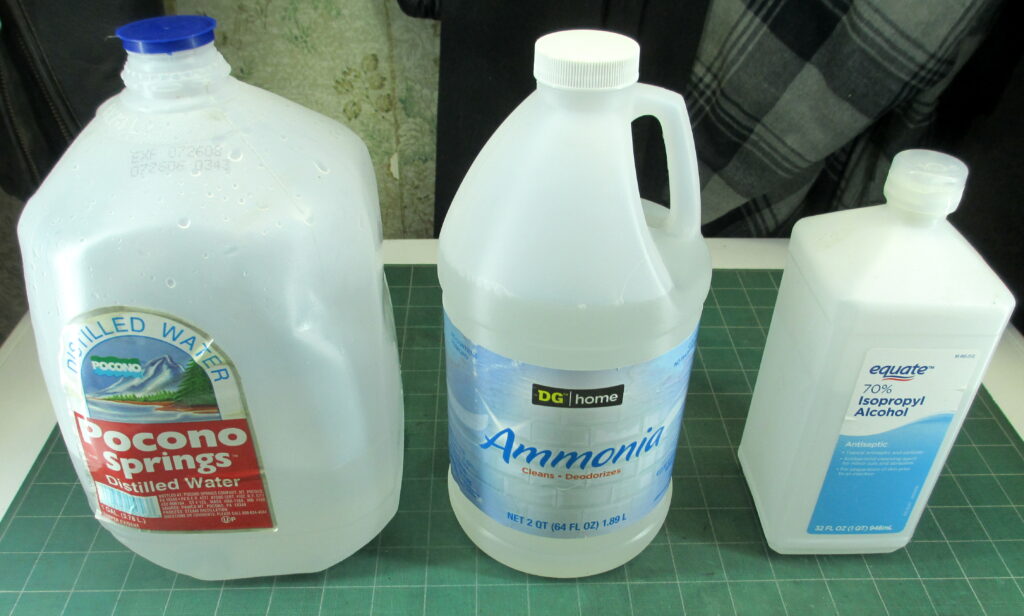
Go to the drug store and get a bottle of ammonia, a bottle of isopropyl alcohol, and a gallon of distilled water.  Put on some old clothes, and find a sink you can get dirty.  You’ll also need a flat-bottomed bowl to work with.

What you need
Take Out the Printhead

I have read lots of different advice about this.  I’ll describe what I did, which worked.  There are no doubt other ways.

  1. Open the printer and the ink door as if you were going to change an ink cartridge.  Then unplug the printer.  It will complain about this when you turn it back on, but it will get over it.
  2. Take out all the ink cartridges.  I put them in a pile and wrapped them with aluminum foil so they wouldn’t dry out.  You probably don’t have to.
  3. Make sure the printhead carriage is lined up with the opening.  The left edge of the carriage should line up with the left edge of the opening.  Move the carriage by hand if necessary.
  4. Open the lower door and make sure it is all the way down (it will click).
  5. Pull on the printhead latch, which is the horizontal plastic bar with all the ink colors on it.  Use a finger in each corner of the bar.  You have to pull pretty hard.  The latch bar should line up with the edge of the opening when it is all the way out.
  6. Remove the printhead.  This is tricky, but easy once you know how.  First, recognize what part is the printhead.  It has the ink ports on it (where the ink cartridges go), and a vertical divider in the middle.  Use two fingers to grab it by that center divider.  Pull it out, but realize that it rotates as it comes out; the top comes out before the bottom, and it will be rotated 90 degrees (with the back side with the electrical contacts facing up) when it comes out.
Clean the Printhead

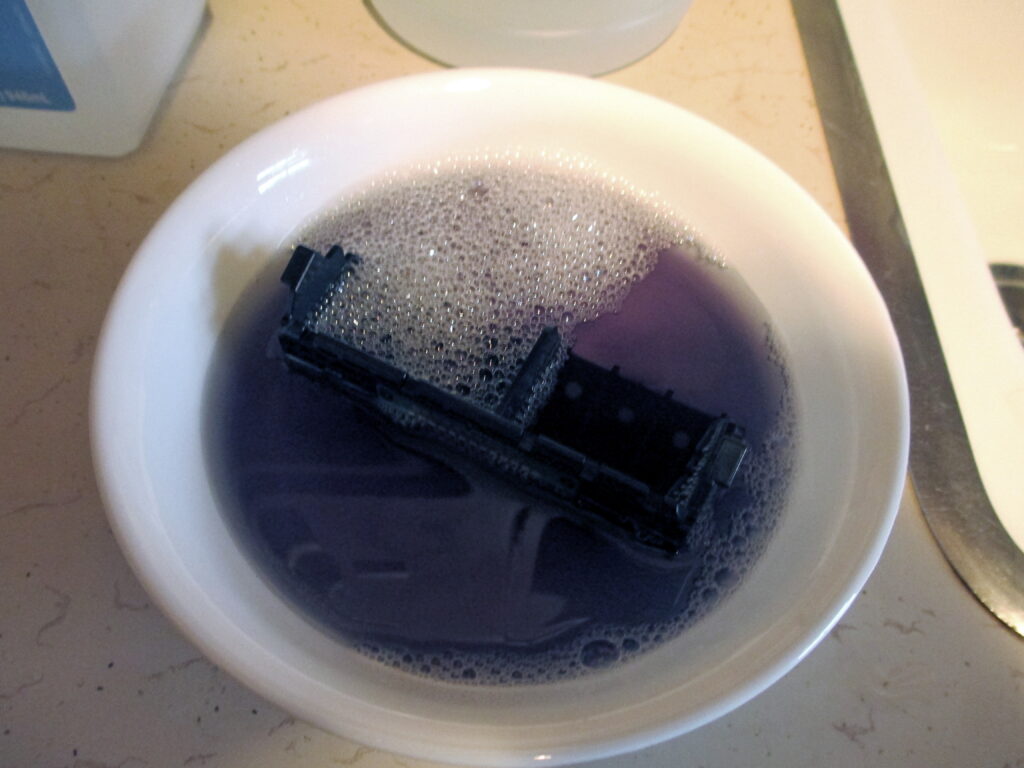
It’s OK to get it wet.  Fill the bowl with warm tap water (or distilled water if your tap water is not good) and add a little alcohol and ammonia.  The proportions aren’t important, use a tablespoon or two of each to each cup of water.  Dunk the printhead and swish it around.  Leave it to soak for a while.  (Don’t put the printhead in the microwave.  That would destroy it.)

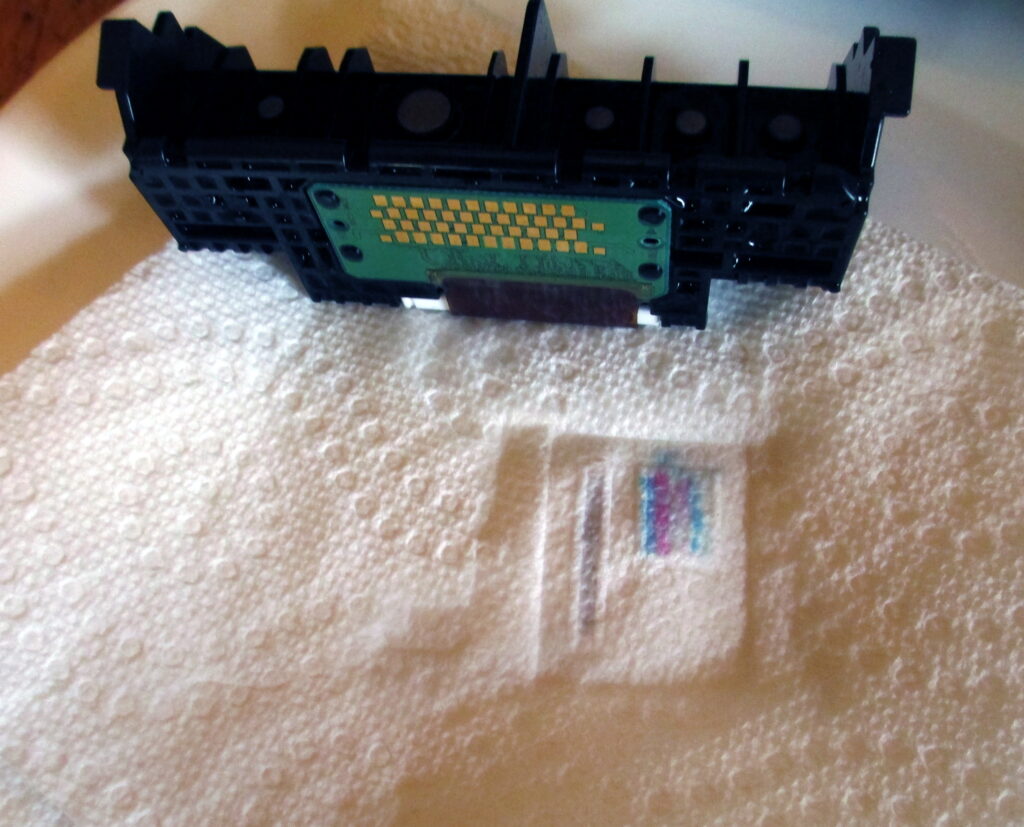
The first soaking gets a lot of ink out

Repeat this process until you don’t see even a trace of color in the water after a good soak.  It will take five or ten times.  In between soakings, run the printhead under the tap until the water runs clear.  Be especially careful to clean the little screens in the ink intake ports.  They seem to collect ink-colored gunk, and I think that gunk is likely to be the problem you’re trying to solve.

Between soakings, also blot the bottom of the printhead on folded paper towels.  If you see ink, you’re not done yet.

This one needs another soaking or two

If you have one, you can try using something like a Water Pik, with warm water.  Direct the stream into the screens not into the bottom of the printhead — you want the clog to come out the bottom, not get pushed back in.

When you’re done the screens should be screen-colored, without gunk or ink residue.  Dunk and swish the printhead one more time, this time using half distilled water and half alcohol but no ammonia.

Dry the printhead on paper towels.  If you’re in a hurry put it in the oven with it set to 120 degrees F for a half hour, or dry gently with a hair dryer.  If you’re not in a hurry let it air-dry overnight.  When you’re done you should be confident the printhead is dry inside and out.  If you heated it, let it cool before reinstalling it.

Reinstall the Printhead

Put the printhead back in the same way you took it out.  Start with the contacts up and the ink intake ports down, with the bottom of the printhead going in first.  If you do it that way it will just drop in once you get it aligned right.  Close the latch to secure the printhead.

Be very sure that the green printed circuit board with all the gold contacts on it is facing straight up, towards the ceiling, as you insert the printhead.

Get Ready To Print

Put the ink cartridges back in (in the right slots!)  I would replace any that don’t have a decent amount of liquid ink in them.  Close up the printer (don’t forget that bottom cover) and plug it back in.

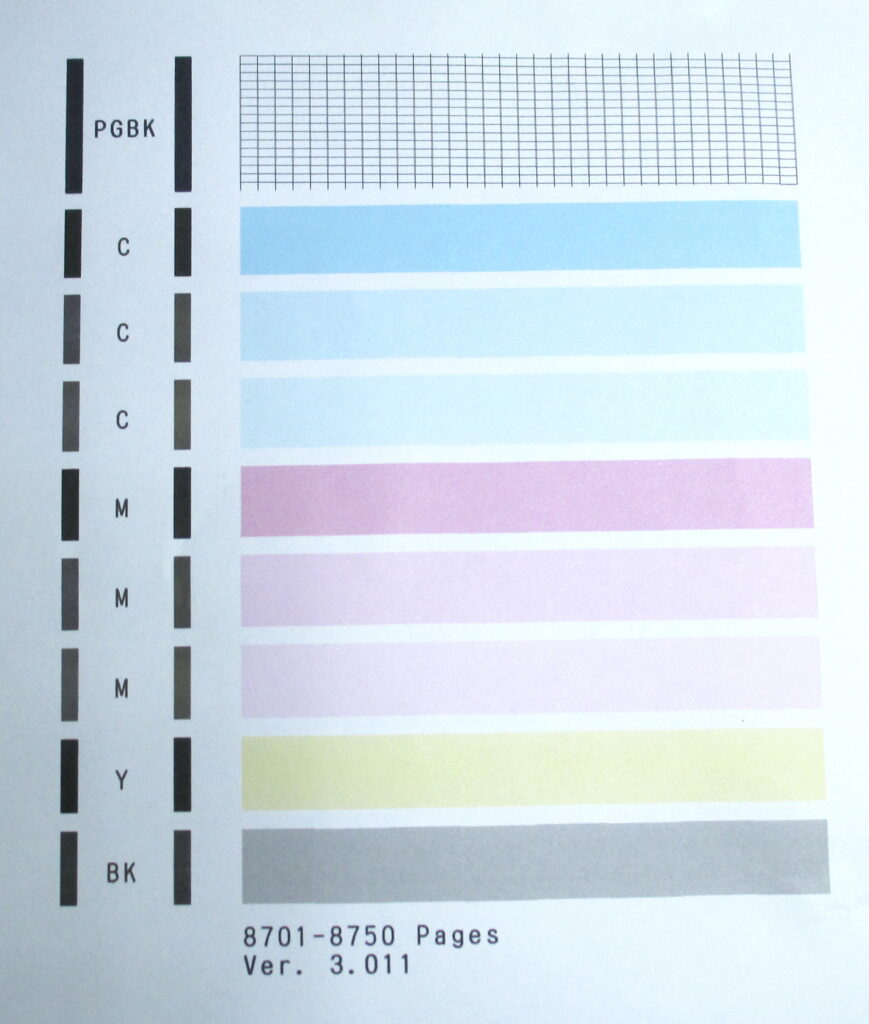
Turn it on.  It will complain about being unplugged while on, which is OK.  Run a deep cleaning, then run a nozzle check.

If everything went well, the nozzle check will be perfect.  If not, run some more cleanings.

This is what it should look like

If this procedure doesn’t fix your printer, well, you’re no worse off than when you started.  Be sure to Google any error codes before giving up; you might have the cartridge in wrong or something else might be wrong that’s fixable.

With a bit of luck, the printer should be good for another couple of trouble-free years.

If You’re Getting Double Printing

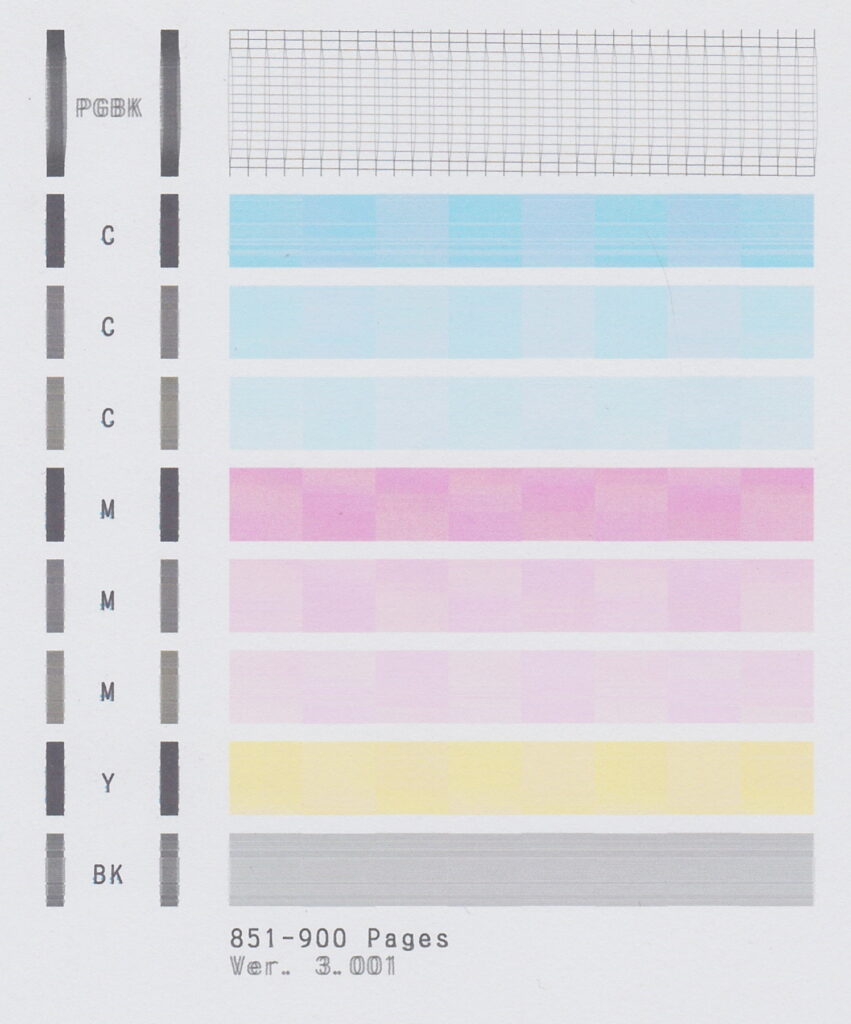
I recently got a printer that had been sitting unused for a few years. I expected all sorts of trouble, but after replacing all five (dry) ink tanks, it started printing pretty well. However, some of the black print was strangely doubled horizontally.

Double printing

Look at the “PGBK” or the “Ver. 3.001” or the middle of the PGBK grid.

I don’t have any idea what causes double printing. Since printing happens in two directions, it might be that the affected nozzles are firing a bit early or late. I was also thinking that the nozzles might be aimed wrong due to debris in them, but that wouldn’t change the print position with printhead direction. It’s a mystery.

I went through the process described in this post. The printhead did look like something was wrong with the middle part of the PGBK ink nozzles. Cleaning cleared that up. But after cleaning, the problem was still there. I’ve ordered a new printhead and hopefully that will fix it. I’ll report on my success once I try the new printhead.

But, while it’s probably worth doing a good cleaning if you have double printing, don’t be too surprised if it doesn’t help.

USB Parallel Port Adapters

If you’re trying to hook up an old printer or other device with a parallel port (DB25) or Centronics (CN36) interface, but you have a newer computer without a parallel port, there are easy-to-use adapters available for a few bucks that will give you the required port.  These ports are also sometimes called IEEE 1284 ports.

Types of Adapters

There are two types of USB -> parallel port adapters.  Both have a USB plug on the computer end, but some give you a parallel port (DB25F) connector on the printer end, while others have a Centronics (CN36) connector on the printer end.

The adapters with a DB25F connector are useful if you are trying to connect to something other than a printer.  Examples are scanners or tape drives with parallel interfaces, dongles used to activate certain old software, or old-style data-transfer applications such as InterLink, included with some versions of DOS.  Some of these require additional cables or adapters.

You can also use this type of adapter to connect to printers with Centronics interfaces by use of a standard old-fashioned printer cable (DB25M to CN36).

The adapters with a Centronics (CN36) connector will plug directly into a printer and avoid the complication and expense of a printer cable.  This is what you need if you’re simply connecting to a printer and do not expect to use the port for other things.

Installing and Using the Adapter

Most of these adapters will just plug into a USB port and work — later versions of Windows have drivers for them built in.  Most adapters also come with one of those annoying mini-CDs with drivers for other OSs or older versions of Windows.

Load the CD if necessary (read the instructions that came with the adapter, perhaps on the CD), then plug the adapter into your USB port.  Windows should load the necessary driver(s) and create a USB virtual printer port.

USB Virtual Printer Ports

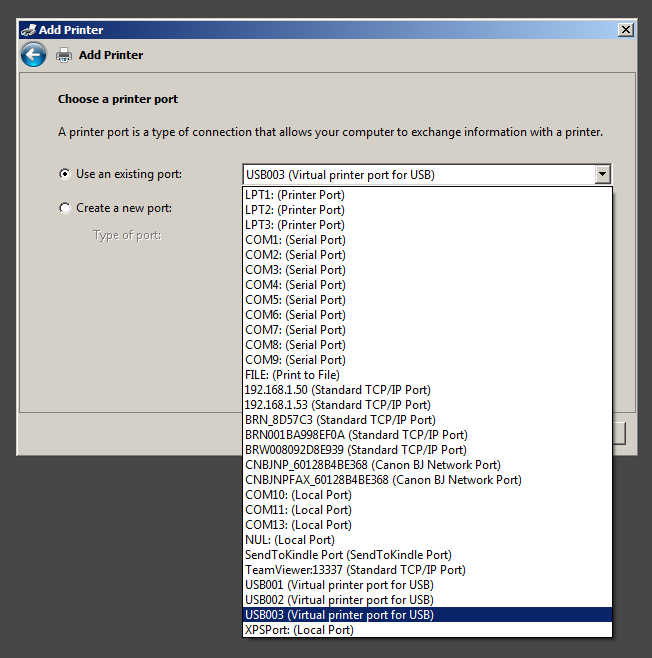
Generally Windows will not recognize printers plugged into one of these adapters.  You’ll have to create a printer device manually.  Go to Devices & Printers -> Add a printer and pick “Add a local printer”.  Then pick “Use an existing port”, and scroll down to find a port named something like “USB001 (Virtual printer port for USB)”.  If there are more than one “USBnnn” ports shown, use the highest number for your first try.  It’s probably the one Windows created last.

Finish creating the printer device by selecting the correct printer driver.  It won’t happen automatically and you may have to find and download one if Windows doesn’t have one built in.  Print a test page and be amazed (or not).

Troubleshooting

These adapters are fussy.  Generally once you get them set up they will just work, but like most computer things, it may take some fiddling to get it right.

In this context “works” means that trying to print makes something happen, even if it isn’t what you want.  You may find that there are driver settings that control margins, orientation, paper feed, or other parameters, that need to be adjusted to get exactly what you want.

You’re on your own here, since there a wide variety of printers out there and each driver has its own peculiarities.  If you got here from another of my articles, that article may have what you need.

Windows Won’t Load the USB Driver

You may get a popup error message when you plug in the adapter, instead of the desired “Your device is ready to use” message.  If this happens try again a couple of times.

Try a different USB port.  Try connecting directly to one of the computer’s USB ports without going through a hub or other USB adapter.  Try without using an extension USB cable, if you’re trying to use one.

Try ignoring the error and see if you can create a printer device as described above, and then see if it works.  Sometimes it will.

If nothing will work, try a new adapter from a different manufacturer.  These adapters are cheap and not every adapter will work with every computer/OS combination.

More Than One “USBnnn” Virtual Printer Port

If you follow these instructions once and they work, and you only have one such adapter (or other USB printer device) installed, you’ll end up with a “USB001” virtual printer port, and that’s the one you need to use.

However, if you do a lot of fussing or you have multiple adapters, you’ll end up with more than one “USBnnn” virtual printer port.  Unfortunately there is no good way to figure out which port goes with which adapter.

As described above, start by trying the highest-numbered one; that will be the last one installed.  But if that one doesn’t work, try the others one at a time.  I recommend rebooting after each change; see below.

Alternatively, unplug the adapter, delete all the “USBnnn” ports, reboot, and start over.  Hopefully you’ll end up with just one.

Windows sometimes doesn’t recognize printer driver port assignments right away.  I recommend rebooting after each change you make.  It is a giant pain, but saves a lot of wasted effort.  Blame Microsoft.

Printer Goes Offline Sometimes

If you get the adapter to work the way you want, you may still find that once in a while it will stop working and the printer won’t print.  If this happens enough to be a problem, try a different adapter.

If you’re willing to live with this, try unplugging the USB connector from the computer, waiting a couple of seconds, and plugging it back in, to the same USB port.  After doing this the printer is likely to begin printing, although there may be a delay of a minute or two for the spooler to retry the operation.  Be patient.

Using These Adapters for Things Other Than Printing

If you are trying to get something like a scanner, Zip drive, dongle, or tape drive to work, or you’re trying to use a data-transfer application like InterLink, you may have to try several of these adapters to get one that will work, or you may find that none of them will.  The adapters are emulating a parallel port, not reproducing one perfectly, and devices that depend on characteristics of hardware ports that are undocumented or are side effects will not always work.

The Adapter Has the Wrong Connector

Please read the section early in this post about the two kinds of USB-to-printer adapters.

The most common problem of this type is when you’re trying to plug the adapter into your printer and the adapter has a DB25F connector and the back of the printer has a CN36 connector.  With this type of adapter you also need a standard parallel printer cable.

There are a wide variety of other connector combinations you might encounter, especially if you’re trying to do something besides just hooking up a printer.  Go to a cable supplier like Monoprice and find a cable with the ends you need.

Other Problems

Generally, you should try a different adapter if you have problems that you can’t solve.  They’re cheap, and it’s no big deal if you end up with two or three of them to try.

Please Comment!

Please let me know by commenting on this post if you find it useful, or if you have suggestions for improving it.  I’m particularly interested in anything I haven’t covered that will help others get these adapters to work.

Mailing & Shipping 101: Label Printers

These are a bit of a luxury but well worth the expense if you ship more than one or two packages or flats a week. You just click “Print” and out comes a professional-looking label ready to use.

Types of Thermal Label Printers

A bit of terminology clarification is needed: there are two kinds of thermal label printers: direct thermal and thermal transfer. Direct thermal is what you want — the labels fade, but that’s not a problem for short-lived shipping labels, and importantly, direct thermal printers don’t require a ribbon. Thermal transfer printers are more versatile and produce longer-lasting labels, but require a ribbon, and are not needed for our purposes.

Label Sizes

There are many sizes of labels that label printers can print. You’ll want to stick with standard 4″ x 6″ labels. These are 4″ wide, and you need to make sure you get a label printer that will handle these labels. Most of the cheaper ones won’t print on labels that wide, and you’ll be asking for trouble if you try to get by with one.

Buying a Thermal Printer

The standard for these printers is the line of Zebra/Eltron printers. They are expensive but you can get deals on used ones on eBay. I bought three of them a couple of years ago for $40 and two of them were good. There are a bunch of models that all function pretty much the same — I go by the appearance of the printer. If it looks like what I want it probably will do.

There are people (including me — see below) who are selling these printers on eBay.  Most are junk, often sold in lots.  A few are tested and include the necessary adapter cables, power supply, and blank labels, and are ready to plug in and use.  Expect to spend $75 – $150.

Many of the used ones only have a parallel (printer) port interface. You probably don’t have one of these on your computer. But you can buy a USB-to-parallel adapter on Amazon or eBay for a few bucks.  I’ve written an article about these adapters to help you understand them, select the right kind, and get it working.  You can find it here: USB Parallel Port Adapters.

If you don’t want to turn this into a science project but are willing to pay a few hundred dollars for a new printer, here are some options:

Prices of course are constantly changing. If I had to choose one I think I’d try the $110 one, but mostly because I’m cheap, and have a high tolerance for having to fuss with things. If you want one that is likely to be trouble-free, go with one of the Zebra ones, or with a reputable seller on eBay.

The above links, and others scattered around, go to Amazon and earn me a small commission. There are also many other suppliers; Google the printer you’re interested in (or “Zebra LP2844”, the standard workhorse). But be careful; many label printers will work with Stamps.com but many won’t.

Sometimes I have label printers for sale on eBay.  If so they will be shown at the bottom of this post.

Buying Thermal Printer Labels

You’ll need a roll of labels. Unless you’re doing a lot of printing, just buy one or two rolls at a time. They typically hold 250 labels which will last you pretty much forever. The labels go bad if they sit around too long, more than a few months.

Here are links to labels on Amazon, both single rolls and multiple rolls (which are a bit cheaper per roll):


Note that there are several sizes of 4″ x 6″ roll labels. You want the rolls of 250 with a 1″ core. Bigger rolls might fit your printer, but I haven’t tried them, and anyways 250 labels is a lot.

Note the price per label: you have to figure it out, but using today’s prices, the most expensive labels cost 2.6 cents each, and in reasonable quantities they get close to a penny a label. Compare that with sheet labels (or Stamps.com labels), and you’ll pay for your label printer from just the savings, before too long.

Drivers for Thermal Printers

You’ll also need a driver. There are a bunch of them floating around, and some work better than others. There are drivers by UPS, Zebra, Seagull Scientific, and others. Google “Zebra Eltron 2844 driver” and pick one. I keep switching from one to another to try to solve minor problems, and there isn’t really much difference.

There are a lot of different printer models, and you may not be able to match your exact printer to an available driver.  Don’t worry too much about this.  If your printer isn’t listed, start with “LP2844”, and then try others if that one doesn’t work.  For me it always does.

Look through the driver properties and set ones that seem like they might be useful, like “Intensity” and “Speed”. Check submenus too — these drivers have a lot of settings.

If labels are printing but aren’t positioned right, go into the driver properties and fuss with the label’s size, orientation, and margins. With some drivers these settings are located on submenus accessed from buttons on the main properties menu.

There are very often ways to define sizes for the various labels you use and give them names. Even if you only use one size of label (like 4″ x 6″) it sometimes helps to define that as a named label size.

If you’re getting the feeling that it may not be super easy to find settings that work, you’re right. But the good news is that once you get it set right it will stay that way. And sometimes you get lucky and it just works the first time.

If all else fails and you can’t find settings that work, try a different driver. There are several of them out there, and while they’re all similar, each differs in some ways.

Zebra/Eltron Test Print

If you have an Eltron (Zebra) label printer, you can get it to print a test page by powering it on while holding down the paper feed button.  It will start blinking red; when that happens release the button.  A test print cycle will begin.

The test print cycle skips a few labels at first, so don’t think it is running away and stop the test.  Eventually it will print a label with some details about the printer firmware.  When that completes the printer will be in dump mode.  In that mode it will print the raw data it is sent.  Press the paper feed button to end dump mode.

The most useful thing on the test print, aside from verifying that the printer isn’t dead, is the gray bar near the top of the test label.  It prints every dot over the width of the printer, in a stair-step pattern.  If it is a nice even gray with very few gaps, the printer is working well.  If there are visible gaps, the printhead is dirty or worn.

You can clean the printhead with an alcohol wipe.  Spend a minute or two on it; some deposits don’t come off right away.

Other Uses for Thermal Printers

By the way, these label printers are good for other things as well. You can print to them just like to any printer, and if you create a 4″ x 6″ page it will come out the way you want. I use this method to print labels for file boxes, for instance.

Also, if you are trying to print labels from a website or program other than Stamps.com you may get labels formatted for printing on regular letter-sized sheets. First see if there is a setting for printing to label printers, and if not use the following technique.

Print the label sheet to a pdf file (or scan a printed page), use a pdf-to-jpg converter to make a jpg file (Google it), and finally use an image-editing program like paint.net to make the part you want to print be 4″ x 6″. You can then simply print the image on your label printer. It sounds complicated but it’s faster than cutting out a plain paper label and taping it to the box.

Label Printers I Have for Sale

Here are any label printers I’m selling on eBay.  They come with everything you need: the printer, a roll of labels, a USB interface, a power supply, all cables, an installation manual, and drivers.  This article can also help you get it working.


Zebra/Eltron Troubleshooting

I have a separate post describing common problems with these printers and what to do about them.  You can find it here .

Baby Duck Syndrome

As a software developer I’ve been fighting baby duck syndrome all my life.  It’s the tendency to stick with the first instance of something you learn, no matter how bad it is.  The expression comes from the imprinting that takes place with baby ducks, where the first thing a baby duck sees after hatching is adopted as its mother, whether it’s actually its mother or not.

A corollary is that the harder something is to learn, the less willing a user is to switch to something new, even if the new thing is much better (and is thus much easier to learn).  The investment made in learning something difficult is seen as being lost, even when a replacement requires much less investment to learn and use.

Wikipedia describes it as:

In human–computer interaction, baby duck syndrome denotes the tendency for computer users to “imprint” on the first system they learn, then judge other systems by their similarity to that first system. The result is that “users generally prefer systems similar to those they learned on and dislike unfamiliar systems”. The issue may present itself relatively early in a computer user’s experience, and it has been observed to impede education of students in new software systems or user interfaces.

In the 80s I was selling a text editor for Prime minicomputers called XEDIT.  It was much simpler and easier to learn than the alternative editor that most people were using, but we had a lot of trouble selling ours.  The problem turned out to be that users had struggled to learn and use the alternative editor, and didn’t want to go through that ordeal again with a new one.  No matter that the new one wasn’t an ordeal at all.  People were afraid.

The problem with baby duck syndrome is that it limits you.  Things tend to get better with time, and new ones tend to be better than old ones — not always of course, but often enough.  The people who overcame their fear and learned our new text editor all loved it, and they greatly improved their efficiency.  Everyone else was stuck in the past.

But it sure is a hard sell.  You’ll do yourself a favor to always remain open to trying new things, even when it seems scary to give up the old.

Mailing & Shipping 101: Stamps.com

I sell a lot of stuff on eBay and have a pretty good system for shipping and mailing stuff.  I thought I’d share how I handle postage…

Internet Postage Suppliers

The first thing you need is an account with an internet postage supplier.  These services are the greatest thing since, well, stamps.   I use www.stamps.com but there are others, such as www.endicia.com.  I’ve only ever used Stamps.com but I like it and it meets my needs well.

The remainder of this post refers to the Stamps.com service, but other services are similar; please post a comment if you have suggestions for use of other services, if you have suggestions or corrections, or if you just find this useful.

These services all have a monthly fee.  For Stamps.com it is $15.99 a month for the basic service, which will have all of the features you need.  If you’re now using a postage meter, this fee will seem like a bargain.  If not, you’ll have to justify it by the time and money you’ll save, and by the value of the convenience it gives you.  I find it very much worth the cost.

Update: there is another online service called www.shipstation.com that I am looking at.  They include a paid subscription to the stamps.com service with your shipstation.com subscription.  As of 12/23/19, shipstation.com costs $9/month and stamps.com costs $17.99.  So it is worth it to use shipstation.com just to get a stamps.com subscription.  If you already have a stamps.com subscription you can keep using it and you won’t get a monthly bill from stamps.com so long as you maintain your shipstation.com subscription.

Overview of the Stamps.com Service

There are basically two ways to use the Stamps.com service:  1) print NetStamps, which are just like stamps but you get to specify the value; and 2) print postage directly on mailpieces or letters.   There are also two versions of the Stamps.com software you can use, an online web-based version, and a version that you install on your computer.

If you use NetStamps you lose much of the value of the service.  You don’t get any discounts on postage, you can’t easily allocate postage expense to categories,  your mail is processed more slowly, and you don’t get free tracking on packages that qualify for it.

In addition, the Stamps.com software has a pretty good address book, so it is easy to specify an address to be printed when you’ve sent mail there before (which for me at least) is almost always the case.  When sending packages to strangers, as is typical with eBay, it is very easy to cut-and-paste an address all at once (not one line at a time), and there is also an automated way to ship out eBay packages where the details are filled in directly from eBay.

Further, for packages you can enter an email address for the recipient, and Stamps.com will send an email with tracking information.

I rarely use NetStamps, and also do not use automation such as links to eBay.  It is easy enough to cut-and-paste the address for the few eBay packages I send out a day, and I like the opportunity to look things over that it gives me.

I prefer to use the Stamps.com software rather than the web-based version.  Maybe it has gotten better, but when I’ve tried to use it in the past I’ve run into too many limitations, especially with printing.  On the other hand, the locally-installed software does everything, and I recommend using it for everything.

What You’ll Need

Most important is a good scale, preferably one that interfaces with the Stamps.com software.  I use an oddball brand (Elane) that has software available (for a small fee) to connect it to the Stamps.com software.  However most new Stamps.com accounts get a free scale, which I presume will connect to the software automatically, so that problem is solved.

Secondly you’ll need a way to print labels.  There are basically two options, though each has variations.  The easiest way to print labels is with a thermal printer, which prints those 4″ x 6″ labels that you see on packages from most any business.  The alternative is to print on letter- or legal-sized sheets, either plain paper or labels.

For NetStamps, you need to print on special (and expensive) label sheets sold by Stamps.com.  For everything else you can use plain labels, although Stamps.com has their expensive labels available for most things, if you want to get fancy.  Ten years into my use of Stamps.com, I’m still using the two NetStamps sheets that I got when I signed up.

Printing on plain paper is cheapest, but you’ll have to cut out the label and then use tape to stick the label to the package.  It’s OK in a pinch but not fun if you have to do it a lot.

There are a wide variety of laser/inkjet labels suitable for use with Stamps.com.  They will give you a professional appearance, and are only slightly more difficult to use than thermal labels.

Label Printers

These print those 4″ x 6″ labels you see on most packages from “real” companies.

They are a bit pricey bit in my opinion well worth the cost.

I’ve written a separate post about them because there is a lot to say:  Mailing & Shipping 101: Label Printers

I sell refurbished Zebra/Eltron label printers (the professional kind) on eBay for a very reasonable price.  Once you try one you won’t be able to live without it.  See the post referenced above for a link to my eBay listing.

Customizing Stamps.com

After you’ve learned the basics, you’ll probably want to customize the way Stamps.com prints envelopes and labels.  You can choose your own font for addresses and return addresses, and can include a logo in some layouts.

Custom Accounts

You can also set up custom accounts to charge postage to, and then get reports telling how much you’ve spent for each account.  This is good if you’re using Stamps.com for business and personal mail, or if you want to be able to bill postage expenses to clients.  Getting reimbursed for some of your postage expenses can easily pay for your Stamps.com subscription.

Hidden Postage

On many types of shipping labels, you can choose to not print the postage amount on the label (it’s still hidden in the bar code so the Post Office knows that you’re paying what you should).  If you sell things on eBay you’ll find this feature useful, especially if you charge for shipping and mark it up.

Printing on Envelopes

You don’t want to use NetStamps for mailing envelopes, except in very unusual circumstances.  Print your envelopes with postage, the recipient’s address, and your return address, all at once.

For office use, this is what you will do most often.  Get a cheap box of 500 #10 business envelopes. and use them for everything, except when you need to use letterhead.  Much of what you will be mailing will be bill payments and such that come with pre-addressed or window return envelopes.  Always toss them.  The only ones to keep are business reply envelopes, since you don’t need to print postage on them.  Remember, you’ll only have to type the address once; in future mailings it will get filled in from the address book.

Using Your Printer to Print Envelopes

The Stamps.com software has calibration steps for setting up the printer for each type of envelope or label to be printed.  Just follow the instructions.  You’ll only have to do it once per envelope/printer combination.

I have had poor luck printing envelopes on inkjet printers, but if that’s all you have, give it a try — you might have better luck than I did.  Laser printers are easier to use, since they typically have a manual-feed slot that can be used for envelopes.  The downside of laser printers is that they will often crinkle the envelopes, but I just live with it.  The recipient will think the Post Office did it.

Whatever printer you use, check out the printer’s help file or manual for specific instructions for printing envelopes.  You are likely to find out that there are special steps, or driver settings, that will make printing envelopes easier or more reliable.  It often makes sense to create a separate driver instance specifically for printing envelopes.

Raised-Print Envelopes

If you need to print on preprinted letterhead-style envelopes, you need to be careful not to use raised-print envelopes in a laser printer – the raised printing will melt and mess things up.  I just put a post-it note over the raised printing (sticky-side entering the printer first).   You can also simply select to not print the return address when printing on an inkjet, or if your preprinted envelopes don’t have raised print.

Special Services

I’ll be discussing special services like Registered and Certified Mail later on.  For now, just know you can add such services when printing envelopes with postage.  What you can’t do is use tracking with letter mail.  In such cases, it’s easiest to just use a Priority Mail Flat Rate envelope, or the First Class Package rate (use cardboard to make the package 3/4″ thick).

Use your scale to determine the correct postage if you’re mailing more than a couple of sheets.

Using Labels With Envelopes

You can also print postage and addresses on labels to affix to your envelope.  This solves the feeding-envelopes problem but adds complexity to the process and doesn’t look as professional.  Many sizes and types of labels can be used.

Discounted Postage

You get a small discount on postage when using Stamps.com to print the envelope, since there is a barcode printed with the address, and the postage itself doesn’t need a printed postmark.  These things also get your letter on its way more quickly.

Printing on Flats

“Flats” are what the Post Office calls flat things like big manila envelopes.  They are more expensive to mail, and require that postage be printed on a label.  If you have a thermal label printer, that’s the easiest way to print the label.  If not, you can use any of a variety of laser/inkjet labels.

Flats are often more than one ounce because of the weight of the envelope.  Be sure to use your scale.

If You Need Tracking

Flats are priced between envelopes and First Class packages and do not have tracking.  They also must be fairly thin (the stamps.com software shows you the rules).  If you want tracking, you can again use a Priority Mail Flat Rate envelope.  Or a trick I use is that if you can make the envelope thick enough it will go as a First Class Package, which costs more but has tracking.  Stick a couple of sheets of corrugated cardboard in the package and you’ll pass the threshold for the package rate.  I’ve found that the Post Office isn’t too strict about this, so if you make an effort it will probably be good enough.

Shipping Packages

Shipping is one area where Stamps.com shines.  You can do the whole job in well under a minute.  You’ll also save money: rates are discounted, sometimes quite a bit, and you’ll be able to easily compare and choose the best service for your needs.

The process is straightforward enough that little guidance is needed.  I can only emphasize that the use of a label printer will cut the time spent in at least half.

Supplies for Shipping

The USPS has a wide variety of boxes, labels, tapes, and forms for use primarily with Priority Mail, and mostly available for free.  Look over the list of supplies on the USPS website (also available within the Stamps.com software), and order everything you think might be useful.  Especially look over the wide range of regular-rate Priority Mail boxes and see if any would be good for things you ship often.

Flat Rate Packaging

The USPS has a variety of Flat Rate Priority Mail packaging available for free.  This can be a great money-saver.  I suggest ordering some of each size, if you do more than a very little shipping.  Don’t forget Priority Mail Padded Flat Rate bags — these are a money-saver for many kinds of shipping.

Regional Rate Packaging

Regional Rate boxes are a series of Priority Mail packaging types that are only available online, and only for use with services like Stamps.com.  Your Post Office won’t have them, and can’t accept them unless they already have postage.

They are like Flat Rate boxes in that they can be any (reasonable) weight, but the rate depends on distance.  There are two sizes each of Regional Rate A and Regional Rate B boxes.  The “A” boxes cost about what two pounds of standard Priority Mail would cost, and the “B” boxes roughly three pounds.  I use these more by far than any other type of packaging.  They are great money-savers and are only available for use with on-line postage services like Stamps.com.

By all means order some of each size of Regional Rate boxes.  Do it today — it’s free.  You can order them from the USPS website, or directly from the Stamps.com software.

Big and Heavy Things

USPS pricing greatly favors small things.  Anything more than about four pounds (and that won’t fit in a Flat Rate box) will likely be cheaper to ship (domestically at least) by FedEx Ground or UPS Ground.  Unfortunately Stamps.com won’t help you with this.  Set yourself up an account with one or both services and use their websites to ship.  I use FedEx mostly, because it’s a bit cheaper and faster, and they deliver on Saturday.  If you are shipping eBay orders, use eBay to print FedEx or UPS labels; they get a better discount than you can get on your own.

If you’re used to using free Priority Mail packaging, you’ll be disappointed to find that you’ll probably need to provide your own boxes for UPS and FedEx.  More about boxes in another post (someday).  There are starting to be a limited variety of free packaging for UPS and FedEx; check with them for details.  So far I haven’t bothered.

You’ll also find that shipping using the FedEx and UPS websites is quite a bit more difficult that using Stamps.com, mostly because you have to enter the name and address into separate fields rather than all at once.

If you’re shipping eBay items, be aware that buying FedEx and UPS labels through eBay is considerably cheaper than by going directly to the UPS or FedEx websites, as well as being much easier.  Ebay has negotiated substantial discounts for its customers.

You have several choices regarding the printing of labels for UPS or FedEx, both of which will give you a letter-size PDF file containing the label.  First, you can print on plain paper and then use a plastic stick-on pouch to affix the label.  Second, you can print on half-page stick-on labels.  Lastly, you can use the method described above to fit the label onto a 4″ x 6″ area and print it on your label printer.  Many of the supplies you need to do these things are available for free from the shipping companies’ websites.

Small and Light Things

I sell a lot of computer parts on eBay, and lots of them are small and light.  Other similar things are CDs, small paperback books, and pretty much anything under a pound.  These things are best shipped at the First Class Package rate.  This even goes for many things that would otherwise qualify for Media Mail.

For First Class Packages, you need your own packaging.  For the most part, I like to use white poly bubble bags, which are strong and cheap.  You can buy these on Amazon or eBay for 10 to 25 cents or so each, in quantity.  I find that three sizes cover almost all of my needs:

If you do much shipping of this type, order 25 of each.  If you have the space and the demand, order more.  They get much cheaper in larger quantities.

Note that these items change price and availability frequently, so these links may not work and you may have to search to find a comparable deal.  [Please leave a comment if you find a link that doesn’t do what it should.]

Carrier Pickup

A great feature of Priority Mail shipping is something called Carrier Pickup.  You can request a pickup up to 2 am of the day of the pickup.  Leave your packages on the front porch (or somewhere safe) and the Post Office will send someone to pick them up.

You can request a pickup from the USPS website, or more simply, from the Stamps.com software.  You must be sending at least one First Class package, Priority Mail, or International item.

Be aware that Carrier Pickup isn’t always reliable.  It will depend on how your local Post Office is run, but you may find the pickups do not always occur as promised.  I keep an eye on things if possible, and give the Post Office a call if it gets past 4 pm and they haven’t picked up what they were asked to.

International Shipping

Here is another place where Stamps.com shines.  If you’ve been hesitant to ship things out of the country, don’t be.  I find I make a considerable percentage of my eBay sales to other countries, sometimes even big and heavy things (I just sold a $130 computer monitor to someone in Switzerland; postage was also $130!).

There are a number of tricks to preparing international shipping labels, but you’ll find they don’t take much more time to prepare than a domestic shipment once you get used to it.  This is primarily because Stamps.com will print the customs data right on the shipping label; no filling out (or figuring out) customs declarations.

International Shipping Services

For packages under 4 lbs, you’ll probably want to use First Class Mail International.  It’s by far the cheapest way to ship, although it supposedly doesn’t include tracking (USPS uses the customs ID number for tracking, FCMI packages have them, and often you’ll see tracking for them, but it’s not guaranteed and doesn’t work in any less-advanced country.)

For shipping of heavier items you’ll need to use Priority Mail International.  It’s expensive but does include tracking.

If you’re in a hurry and cost is no object, there are Priority Mail Express International, and Global Express Guaranteed (GXG).  GXG goes by FedEx I think, and has to be done at the Post Office — it’s not supported by Stamps.com.  And it’s very expensive.

International Address Entry

You initially enter the address the usual Stamps.com way — pasting it free-form into the address box.  Then when you try to do most anything, such as selecting the mail class, up pops a form with the address you entered broken into parts.

Stamps.com doesn’t do a very good job of this, and further, many foreign addresses don’t readily fit into the boxes they give you.  I usually just cut-and-paste things to get them as close to right as possible.  I’ve also seen cases where information gets left out.  Carefully compare the Stamps.com version of the address with the original and make sure everything’s there.

The Recipient’s Phone Number

International shipments require that you supply the recipient’s phone number and email address.  You can often get these from eBay or PayPal records, but sometimes you won’t have them.  In such cases I just enter my own email address and/or phone number.  At least if there is a problem with delivery it will give me a chance to straighten things out.

Customs Forms

Click on the button Complete Customs Forms and you’ll be taken to a new form where you need to enter information about what you’re shipping.  Fill out the top items, then fill out the line describing what you’re sending and pick the Add Item target to add what you’ve entered to the list.  Repeat if you’re sending more than one thing.  Make sure the “Agree” box is checked, pick OK, and you’re done!

For small things with little value, all the customs data will appear on the postage label you print.  You don’t have to do anything else.

Sometimes you’ll get three copies of the label.  Put the first one on the package as usual, and put the other two in a document pouch (leave the backing on the labels) and affix it to the package near the address label.  I usually put a couple of copies of the invoice for the shipment in the pouch too.  [The pouches are available free from the USPS website.]

International Letter Mail

For some reason I can’t understand, you can’t print regular First Class International letter postage on envelopes (or labels for that matter).  It is quite frustrating.  You’ll need to figure out the appropriate postage and print a NetStamp for this.

Special Services

If you use special services like Registered Mail, you’ll appreciate the fact that you can do most such things directly from the Stamps.com software.  Sometimes you’ll have to fill out or attach additional forms, and sometimes you’ll still have to take a mailpiece to the Post Office, but overall it’s all quite easy.  I’ll go over the most common special services in the following sections.

To access the Special Services menu, pick the Add’l Options: Select button.

Registered Mail

Registered Mail is used to send valuable things that need to be watched over for the entire journey, and signed for on delivery.  It is quite expensive and can include insurance for additional cost.  I’m including it here only because it frequently gets confused with Certified Mail.

You can include Registered Mail fees when you print postage, but you’ll have to use a special Registered Mail sticker, and bring your mailpiece to the Post Office and physically hand it to a clerk.

There are a lot of other rules and restrictions.  Look them up if you need to use this service.

Certified Mail

Certified Mail is used when you need proof of delivery.  This is used for mailing tax returns, legal documents, and the like.  If you’re not sure whether you need Registered or Certified Mail, you probably want Certified.  Registered is for valuable things; Certified is for important things.

You can include Certified Mail fees when printing postage, and if you use Certified Mail a lot, you can even print everything, including the return receipt, all at once using special forms available from Stamps.com.  If you only do occasional Certified Mail, just get some Certified Mail stickers (and green postcards as described in the next section) and affix them manually.

If you don’t need proof of mailing, you can put Certified Mail in with your regular outgoing mail.  Otherwise, take it to the Post Office and get a receipt with a postmark from the clerk.

Return Receipt

If you use Registered or Certified, you’re likely to want a record of the receipt of the mailpiece at its destination.  This is the familiar green postcard.  There is also something called an Electronic Return Receipt which is cheaper and which also constitutes legal proof of delivery.  I prefer the good old green postcard.

If you use an Electronic Return Receipt, your mailpiece must be taken to the Post Office.  If you are using the green postcard, you can put the mailpiece in with your regular outgoing mail.

Insurance

You can buy USPS insurance along with your postage, but Stamps.com has its own insurance which is cheaper and is easier to file claims under.  USPS insurance is purchased at the time of mailing under the Special Services menu.  You also need to affix a special label to your package, and hand it to a clerk at the Post Office.

Some USPS mail classes have additional insurance included with the cost of the postage.  Priority Mail is insured for $50 or $100, and Priority Mail International for $100 or $200.  Look it up if you want the details.

Stamps.com insurance is purchased on the main postage screen and is billed with your Stamps.com monthly fee.  You can also purchase the insurance for a time after mailing; go to Tools->Buy Insurance to do so.

Note that USPS insurance will refund the value of the item plus the cost of postage if an item is lost or destroyed; Stamps.com will only refund the value of the item.  This can be a significant issue if what you are shipping isn’t much more valuable than the postage, as is often the case with international shipments.