Monthly Archives: February 2018

USB Parallel Port Adapters

If you’re trying to hook up an old printer or other device with a parallel port (DB25) or Centronics (CN36) interface, but you have a newer computer without a parallel port, there are easy-to-use adapters available for a few bucks that will give you the required port.  These ports are also sometimes called IEEE 1284 ports.

Types of Adapters

There are two types of USB -> parallel port adapters.  Both have a USB plug on the computer end, but some give you a parallel port (DB25F) connector on the printer end, while others have a Centronics (CN36) connector on the printer end.

The adapters with a DB25F connector are useful if you are trying to connect to something other than a printer.  Examples are scanners or tape drives with parallel interfaces, dongles used to activate certain old software, or old-style data-transfer applications such as InterLink, included with some versions of DOS.  Some of these require additional cables or adapters.

You can also use this type of adapter to connect to printers with Centronics interfaces by use of a standard old-fashioned printer cable (DB25M to CN36).

The adapters with a Centronics (CN36) connector will plug directly into a printer and avoid the complication and expense of a printer cable.  This is what you need if you’re simply connecting to a printer and do not expect to use the port for other things.

Installing and Using the Adapter

Most of these adapters will just plug into a USB port and work — later versions of Windows have drivers for them built in.  Most adapters also come with one of those annoying mini-CDs with drivers for other OSs or older versions of Windows.

Load the CD if necessary (read the instructions that came with the adapter, perhaps on the CD), then plug the adapter into your USB port.  Windows should load the necessary driver(s) and create a USB virtual printer port.

USB Virtual Printer Ports

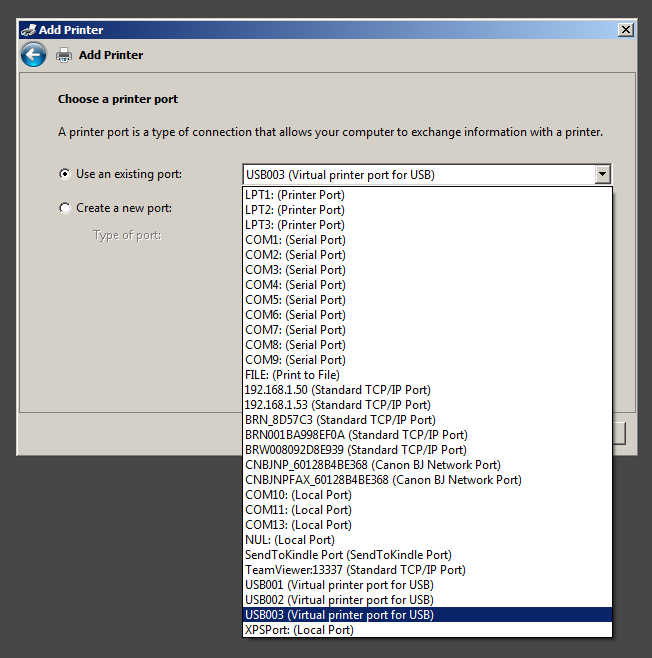
Generally Windows will not recognize printers plugged into one of these adapters.  You’ll have to create a printer device manually.  Go to Devices & Printers -> Add a printer and pick “Add a local printer”.  Then pick “Use an existing port”, and scroll down to find a port named something like “USB001 (Virtual printer port for USB)”.  If there are more than one “USBnnn” ports shown, use the highest number for your first try.  It’s probably the one Windows created last.

Finish creating the printer device by selecting the correct printer driver.  It won’t happen automatically and you may have to find and download one if Windows doesn’t have one built in.  Print a test page and be amazed (or not).

Troubleshooting

These adapters are fussy.  Generally once you get them set up they will just work, but like most computer things, it may take some fiddling to get it right.

In this context “works” means that trying to print makes something happen, even if it isn’t what you want.  You may find that there are driver settings that control margins, orientation, paper feed, or other parameters, that need to be adjusted to get exactly what you want.

You’re on your own here, since there a wide variety of printers out there and each driver has its own peculiarities.  If you got here from another of my articles, that article may have what you need.

Windows Won’t Load the USB Driver

You may get a popup error message when you plug in the adapter, instead of the desired “Your device is ready to use” message.  If this happens try again a couple of times.

Try a different USB port.  Try connecting directly to one of the computer’s USB ports without going through a hub or other USB adapter.  Try without using an extension USB cable, if you’re trying to use one.

Try ignoring the error and see if you can create a printer device as described above, and then see if it works.  Sometimes it will.

If nothing will work, try a new adapter from a different manufacturer.  These adapters are cheap and not every adapter will work with every computer/OS combination.

More Than One “USBnnn” Virtual Printer Port

If you follow these instructions once and they work, and you only have one such adapter (or other USB printer device) installed, you’ll end up with a “USB001” virtual printer port, and that’s the one you need to use.

However, if you do a lot of fussing or you have multiple adapters, you’ll end up with more than one “USBnnn” virtual printer port.  Unfortunately there is no good way to figure out which port goes with which adapter.

As described above, start by trying the highest-numbered one; that will be the last one installed.  But if that one doesn’t work, try the others one at a time.  I recommend rebooting after each change; see below.

Alternatively, unplug the adapter, delete all the “USBnnn” ports, reboot, and start over.  Hopefully you’ll end up with just one.

Windows sometimes doesn’t recognize printer driver port assignments right away.  I recommend rebooting after each change you make.  It is a giant pain, but saves a lot of wasted effort.  Blame Microsoft.

Printer Goes Offline Sometimes

If you get the adapter to work the way you want, you may still find that once in a while it will stop working and the printer won’t print.  If this happens enough to be a problem, try a different adapter.

If you’re willing to live with this, try unplugging the USB connector from the computer, waiting a couple of seconds, and plugging it back in, to the same USB port.  After doing this the printer is likely to begin printing, although there may be a delay of a minute or two for the spooler to retry the operation.  Be patient.

Using These Adapters for Things Other Than Printing

If you are trying to get something like a scanner, Zip drive, dongle, or tape drive to work, or you’re trying to use a data-transfer application like InterLink, you may have to try several of these adapters to get one that will work, or you may find that none of them will.  The adapters are emulating a parallel port, not reproducing one perfectly, and devices that depend on characteristics of hardware ports that are undocumented or are side effects will not always work.

The Adapter Has the Wrong Connector

Please read the section early in this post about the two kinds of USB-to-printer adapters.

The most common problem of this type is when you’re trying to plug the adapter into your printer and the adapter has a DB25F connector and the back of the printer has a CN36 connector.  With this type of adapter you also need a standard parallel printer cable.

There are a wide variety of other connector combinations you might encounter, especially if you’re trying to do something besides just hooking up a printer.  Go to a cable supplier like Monoprice and find a cable with the ends you need.

Other Problems

Generally, you should try a different adapter if you have problems that you can’t solve.  They’re cheap, and it’s no big deal if you end up with two or three of them to try.

Please Comment!

Please let me know by commenting on this post if you find it useful, or if you have suggestions for improving it.  I’m particularly interested in anything I haven’t covered that will help others get these adapters to work.

Mailing & Shipping 101: Label Printers

These are a bit of a luxury but well worth the expense if you ship more than one or two packages or flats a week. You just click “Print” and out comes a professional-looking label ready to use.

Types of Thermal Label Printers

A bit of terminology clarification is needed: there are two kinds of thermal label printers: direct thermal and thermal transfer. Direct thermal is what you want — the labels fade, but that’s not a problem for short-lived shipping labels, and importantly, direct thermal printers don’t require a ribbon. Thermal transfer printers are more versatile and produce longer-lasting labels, but require a ribbon, and are not needed for our purposes.

Label Sizes

There are many sizes of labels that label printers can print. You’ll want to stick with standard 4″ x 6″ labels. These are 4″ wide, and you need to make sure you get a label printer that will handle these labels. Most of the cheaper ones won’t print on labels that wide, and you’ll be asking for trouble if you try to get by with one.

Buying a Thermal Printer

The standard for these printers is the line of Zebra/Eltron printers. They are expensive but you can get deals on used ones on eBay. I bought three of them a couple of years ago for $40 and two of them were good. There are a bunch of models that all function pretty much the same — I go by the appearance of the printer. If it looks like what I want it probably will do.

There are people (including me — see below) who are selling these printers on eBay.  Most are junk, often sold in lots.  A few are tested and include the necessary adapter cables, power supply, and blank labels, and are ready to plug in and use.  Expect to spend $75 – $150.

Many of the used ones only have a parallel (printer) port interface. You probably don’t have one of these on your computer. But you can buy a USB-to-parallel adapter on Amazon or eBay for a few bucks.  I’ve written an article about these adapters to help you understand them, select the right kind, and get it working.  You can find it here: USB Parallel Port Adapters.

If you don’t want to turn this into a science project but are willing to pay a few hundred dollars for a new printer, here are some options:

Prices of course are constantly changing. If I had to choose one I think I’d try the $110 one, but mostly because I’m cheap, and have a high tolerance for having to fuss with things. If you want one that is likely to be trouble-free, go with one of the Zebra ones, or with a reputable seller on eBay.

The above links, and others scattered around, go to Amazon and earn me a small commission. There are also many other suppliers; Google the printer you’re interested in (or “Zebra LP2844”, the standard workhorse). But be careful; many label printers will work with Stamps.com but many won’t.

Sometimes I have label printers for sale on eBay.  If so they will be shown at the bottom of this post.

Buying Thermal Printer Labels

You’ll need a roll of labels. Unless you’re doing a lot of printing, just buy one or two rolls at a time. They typically hold 250 labels which will last you pretty much forever. The labels go bad if they sit around too long, more than a few months.

Here are links to labels on Amazon, both single rolls and multiple rolls (which are a bit cheaper per roll):


Note that there are several sizes of 4″ x 6″ roll labels. You want the rolls of 250 with a 1″ core. Bigger rolls might fit your printer, but I haven’t tried them, and anyways 250 labels is a lot.

Note the price per label: you have to figure it out, but using today’s prices, the most expensive labels cost 2.6 cents each, and in reasonable quantities they get close to a penny a label. Compare that with sheet labels (or Stamps.com labels), and you’ll pay for your label printer from just the savings, before too long.

Drivers for Thermal Printers

You’ll also need a driver. There are a bunch of them floating around, and some work better than others. There are drivers by UPS, Zebra, Seagull Scientific, and others. Google “Zebra Eltron 2844 driver” and pick one. I keep switching from one to another to try to solve minor problems, and there isn’t really much difference.

There are a lot of different printer models, and you may not be able to match your exact printer to an available driver.  Don’t worry too much about this.  If your printer isn’t listed, start with “LP2844”, and then try others if that one doesn’t work.  For me it always does.

Look through the driver properties and set ones that seem like they might be useful, like “Intensity” and “Speed”. Check submenus too — these drivers have a lot of settings.

If labels are printing but aren’t positioned right, go into the driver properties and fuss with the label’s size, orientation, and margins. With some drivers these settings are located on submenus accessed from buttons on the main properties menu.

There are very often ways to define sizes for the various labels you use and give them names. Even if you only use one size of label (like 4″ x 6″) it sometimes helps to define that as a named label size.

If you’re getting the feeling that it may not be super easy to find settings that work, you’re right. But the good news is that once you get it set right it will stay that way. And sometimes you get lucky and it just works the first time.

If all else fails and you can’t find settings that work, try a different driver. There are several of them out there, and while they’re all similar, each differs in some ways.

Zebra/Eltron Test Print

If you have an Eltron (Zebra) label printer, you can get it to print a test page by powering it on while holding down the paper feed button.  It will start blinking red; when that happens release the button.  A test print cycle will begin.

The test print cycle skips a few labels at first, so don’t think it is running away and stop the test.  Eventually it will print a label with some details about the printer firmware.  When that completes the printer will be in dump mode.  In that mode it will print the raw data it is sent.  Press the paper feed button to end dump mode.

The most useful thing on the test print, aside from verifying that the printer isn’t dead, is the gray bar near the top of the test label.  It prints every dot over the width of the printer, in a stair-step pattern.  If it is a nice even gray with very few gaps, the printer is working well.  If there are visible gaps, the printhead is dirty or worn.

You can clean the printhead with an alcohol wipe.  Spend a minute or two on it; some deposits don’t come off right away.

Other Uses for Thermal Printers

By the way, these label printers are good for other things as well. You can print to them just like to any printer, and if you create a 4″ x 6″ page it will come out the way you want. I use this method to print labels for file boxes, for instance.

Also, if you are trying to print labels from a website or program other than Stamps.com you may get labels formatted for printing on regular letter-sized sheets. First see if there is a setting for printing to label printers, and if not use the following technique.

Print the label sheet to a pdf file (or scan a printed page), use a pdf-to-jpg converter to make a jpg file (Google it), and finally use an image-editing program like paint.net to make the part you want to print be 4″ x 6″. You can then simply print the image on your label printer. It sounds complicated but it’s faster than cutting out a plain paper label and taping it to the box.

Label Printers I Have for Sale

Here are any label printers I’m selling on eBay.  They come with everything you need: the printer, a roll of labels, a USB interface, a power supply, all cables, an installation manual, and drivers.  This article can also help you get it working.


Zebra/Eltron Troubleshooting

I have a separate post describing common problems with these printers and what to do about them.  You can find it here .

Baby Duck Syndrome

As a software developer I’ve been fighting baby duck syndrome all my life.  It’s the tendency to stick with the first instance of something you learn, no matter how bad it is.  The expression comes from the imprinting that takes place with baby ducks, where the first thing a baby duck sees after hatching is adopted as its mother, whether it’s actually its mother or not.

A corollary is that the harder something is to learn, the less willing a user is to switch to something new, even if the new thing is much better (and is thus much easier to learn).  The investment made in learning something difficult is seen as being lost, even when a replacement requires much less investment to learn and use.

Wikipedia describes it as:

In human–computer interaction, baby duck syndrome denotes the tendency for computer users to “imprint” on the first system they learn, then judge other systems by their similarity to that first system. The result is that “users generally prefer systems similar to those they learned on and dislike unfamiliar systems”. The issue may present itself relatively early in a computer user’s experience, and it has been observed to impede education of students in new software systems or user interfaces.

In the 80s I was selling a text editor for Prime minicomputers called XEDIT.  It was much simpler and easier to learn than the alternative editor that most people were using, but we had a lot of trouble selling ours.  The problem turned out to be that users had struggled to learn and use the alternative editor, and didn’t want to go through that ordeal again with a new one.  No matter that the new one wasn’t an ordeal at all.  People were afraid.

The problem with baby duck syndrome is that it limits you.  Things tend to get better with time, and new ones tend to be better than old ones — not always of course, but often enough.  The people who overcame their fear and learned our new text editor all loved it, and they greatly improved their efficiency.  Everyone else was stuck in the past.

But it sure is a hard sell.  You’ll do yourself a favor to always remain open to trying new things, even when it seems scary to give up the old.