This article describes some of the troubleshooting tips I’ve discovered for solving problems printing labels with Zebra Eltron label printers.
Power Supply Problems
Most of the label printers you get on eBay come without power supplies. However, other sellers have power supplies that are claimed to be for these printers available for $10 or so, and I’ve bought a lot of them. Everything has been fine until recently when I started having printers fail in a way that points to the power supply.
Some Background
The original OEM power supplies were big bricks rated at 14VAC and 4A. Much to my surprise the power supplies from eBay are rated at 20VDC at 3.25A. My guess is that the original power supplies feed AC to a rectifier directly, and feeding it DC gives the same result without the rectifier having to do anything.
There’s also the issue of 14V vs 20V. Maybe the 14VAC ends up closer to 20VDC after being rectified; I’m not an expert on electronics but 20VDC seems to work. Sort of.
I also don’t know how many amps a rectified 14VAC at 4A becomes when it gets converted to DC
I just ordered a new batch of power supplies and this time they were 20VDC at 2A. I sent them back.
The Failure Mode
At best the printers I sell with 3.25A supplies tend to print lines that cover the full width of the label somewhat washed out. I always thought it was caused by a weak power supply, but it was never bad enough that I was motivated to try to figure it out.
Now, I have several printers that with the 3.25A supplies will print an inch or so of the label then die. The way it dies is that the printer stops, the light on the button goes out, and it makes a strange “burp” noise. The light on the button then comes back on and the printer is back to normal. The light going out momentarily suggests strongly that the printer overtaxed its power supply. It gets about an inch of label printed before this happens.
Another clue: with the 2A supplies it gets a quarter of an inch of label printed before dying the same way. Less current, less label.
I’ve had the same results with several printers and several power supplies. Something is going on.
Capacitors
Inside the printer are two big capacitors, 22000 uF if that means anything to you. The printers are all getting to be 20 years old, so it’s possible that the capacitors are failing. Capacitors store electricity and could be doing two things inside the printer: smoothing out the rectified AC, and building up a reserve of power for doing things like printing wide black lines.
Next Steps
I’ve ordered a 4.5A 20VDC supply to see if it works better. I’ve also ordered a couple of new capacitors, and I’m hoping that they will make the problem go away.
Update 1: I got the new capacitors today, installed them, and the printer still failed the same way. So it isn’t the capacitors. Oh well, I had hoped that would explain things.
Update 2: I tried printing with a bigger (4.74A instead of 3.25A) and the problem went away. So it sounds like this is indeed a power supply problem. But with the “solution” given in the next section, you (and I) can manage just fine with the smaller power supplies.
The Solution
A little careful searching led me to the solution. If you crank the darkness up to the maximum in the printer driver this failure will happen. I had recently tried turning up the darkness. So I backed it off to 12 or so and the problem went away.
The Jaggies
There is a setting in the driver for this printer that controls dithering. This is one of several techniques used to compensate for the low resolution of the printers by smoothing out edges. It’s useful if you are trying to print photographs or low-resolution graphics, but it causes print quality problems when printing labels. Unfortunately the default setting in the driver is for dithering to be on.
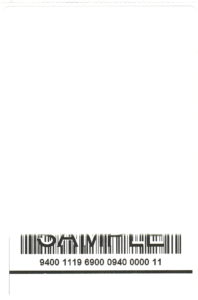
It can sometimes be hard to recognize labels with the jaggies. Often the sense is just that things don’t look as good as they should, or that some labels look better than others. The problem is especially acute if you’re trying to print a scanned label. Here is a label, printed with stamps.com software, that has the jaggies:
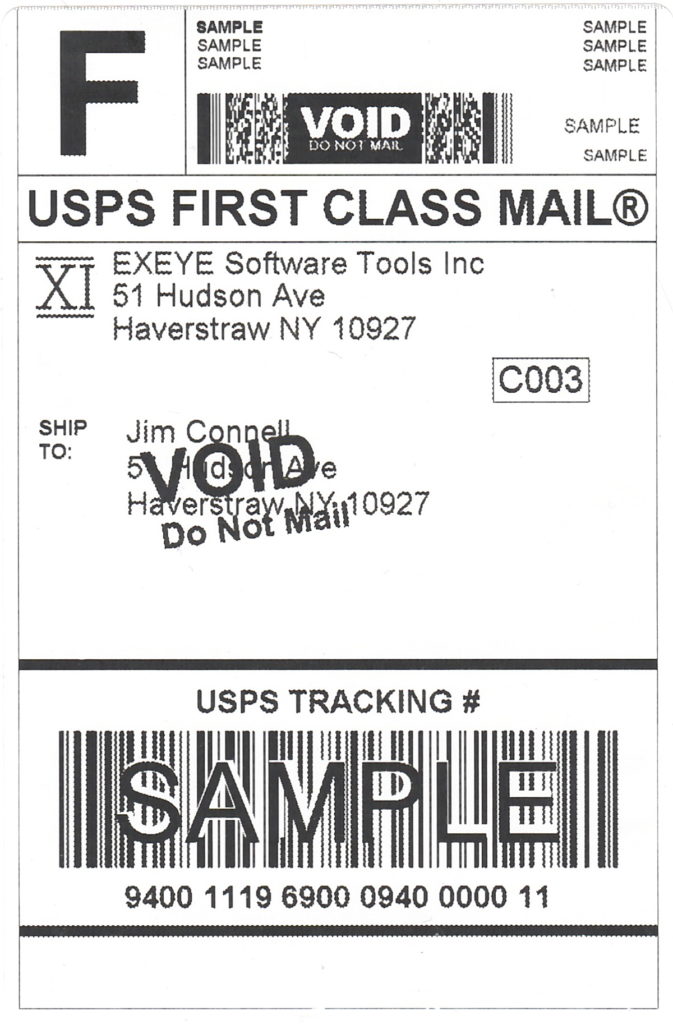
Look especially at the “XI” logo next to the return address. Once you start seeing the jaggies they are all over the place. Now compare the above label with this one, printed with dithering turned off:
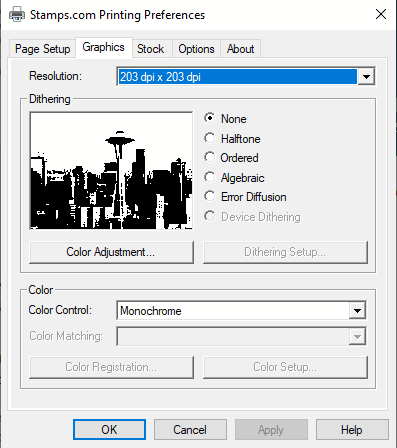
Turning Off Dithering
If you think you have dithering turned on (it’s on by default) it’s easy to check the setting and change it. Get into Printer Preferences for the Zebra Eltron printer (there are many ways to do this, and they vary by which version of Windows you are using). There will be several tabs; pick the Graphics tab. Look for the Dithering section. One of the options will be selected; if the option None isn’t the one selected, select it. Then just pick OK and you’ll be done. Here’s a picture of the dithering settings:
One thought on “Troubleshooting Zebra/Eltron Label Printers”