I’ve been using (and selling) Canon MX922 inkjet multifunction printers for a long time and very much like them. They do pretty much everything, and I’ve seen them on sale for $49 (a couple of years ago). If you use them with non-OEM ink, you can get your cost per page down to pretty much the cost of the paper.
Unfortunately the MX922 has been discontinued. I’ve done a lot of searching and haven’t found a reasonable replacement. at any price, from any manufacturer. There are new and used ones for sale on eBay and other places, but you’re likely to pay over $300 for one (as of mid-2021). It’s a measure of how good these printers are, and why it’s worth considerable effort and expense to keep them running.
I don’t know if non-OEM ink can cause problems, but I use it exclusively with good results. You may have trouble with colors being a bit off when printing on photo paper. You also may end up with a clogged printhead, which is what this post is about. I don’t know if I would have had the same trouble if I used Canon ink, but from what I read online, you will end up with a clogged printhead eventually no matter what ink you use.
This post really needs some pictures but I’m not that motivated right now. Maybe someday…
The Symptoms
Your printhead is clogged if there are problems visible on a nozzle check print, and running the printhead cleaning and deep cleaning routines don’t solve the problem, or only solve it for a short time.
If you’re having double printing, see the end of this post.
What To Do
When this happens you can buy a new printer, they’re cheap after all (at least they used to be), or you can buy a new printhead, which used to cost as much or more than a new printer but now looks like a good deal if you can find one. Or you can try to clean the printhead. It’s messy and takes a while, and you risk damaging the printer, but the printer is close to worthless at this point anyhow.
Update: as of July 2021, printheads are very cheap and very available on eBay. It looks like somebody made a non-OEM version, and they are closing them out for around $25 or $30. I would recommend buying a couple if you want to keep your printer working for a long time. It also changes the economics of cleaning them — you have to ask whether it’s worth $30 to have to go through the trouble of cleaning the old one.
I got my cheap printheads from China, installed one, and it works! The nozzle check pattern isn’t quite perfect (faint unevenness in the small-ink-tank black), but for normal use it prints just fine. I recommend these printheads!
Get Some Supplies
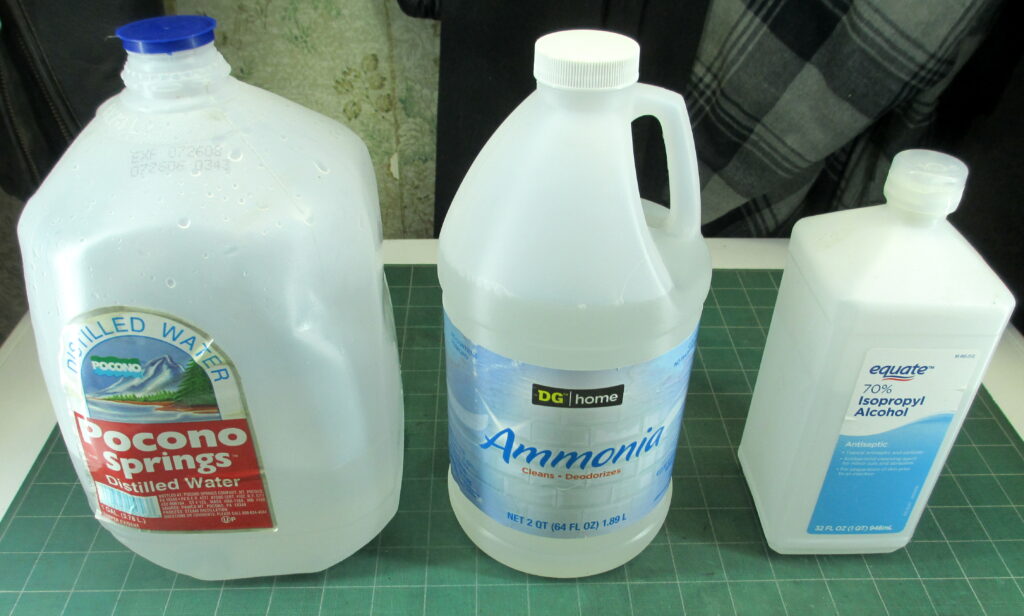
Go to the drug store and get a bottle of ammonia, a bottle of isopropyl alcohol, and a gallon of distilled water. Put on some old clothes, and find a sink you can get dirty. You’ll also need a flat-bottomed bowl to work with.
Take Out the Printhead
I have read lots of different advice about this. I’ll describe what I did, which worked. There are no doubt other ways.
- Open the printer and the ink door as if you were going to change an ink cartridge. Then unplug the printer. It will complain about this when you turn it back on, but it will get over it.
- Take out all the ink cartridges. I put them in a pile and wrapped them with aluminum foil so they wouldn’t dry out. You probably don’t have to.
- Make sure the printhead carriage is lined up with the opening. The left edge of the carriage should line up with the left edge of the opening. Move the carriage by hand if necessary.
- Open the lower door and make sure it is all the way down (it will click).
- Pull on the printhead latch, which is the horizontal plastic bar with all the ink colors on it. Use a finger in each corner of the bar. You have to pull pretty hard. The latch bar should line up with the edge of the opening when it is all the way out.
- Remove the printhead. This is tricky, but easy once you know how. First, recognize what part is the printhead. It has the ink ports on it (where the ink cartridges go), and a vertical divider in the middle. Use two fingers to grab it by that center divider. Pull it out, but realize that it rotates as it comes out; the top comes out before the bottom, and it will be rotated 90 degrees (with the back side with the electrical contacts facing up) when it comes out.
Clean the Printhead
It’s OK to get it wet. Fill the bowl with warm tap water (or distilled water if your tap water is not good) and add a little alcohol and ammonia. The proportions aren’t important, use a tablespoon or two of each to each cup of water. Dunk the printhead and swish it around. Leave it to soak for a while. (Don’t put the printhead in the microwave. That would destroy it.)
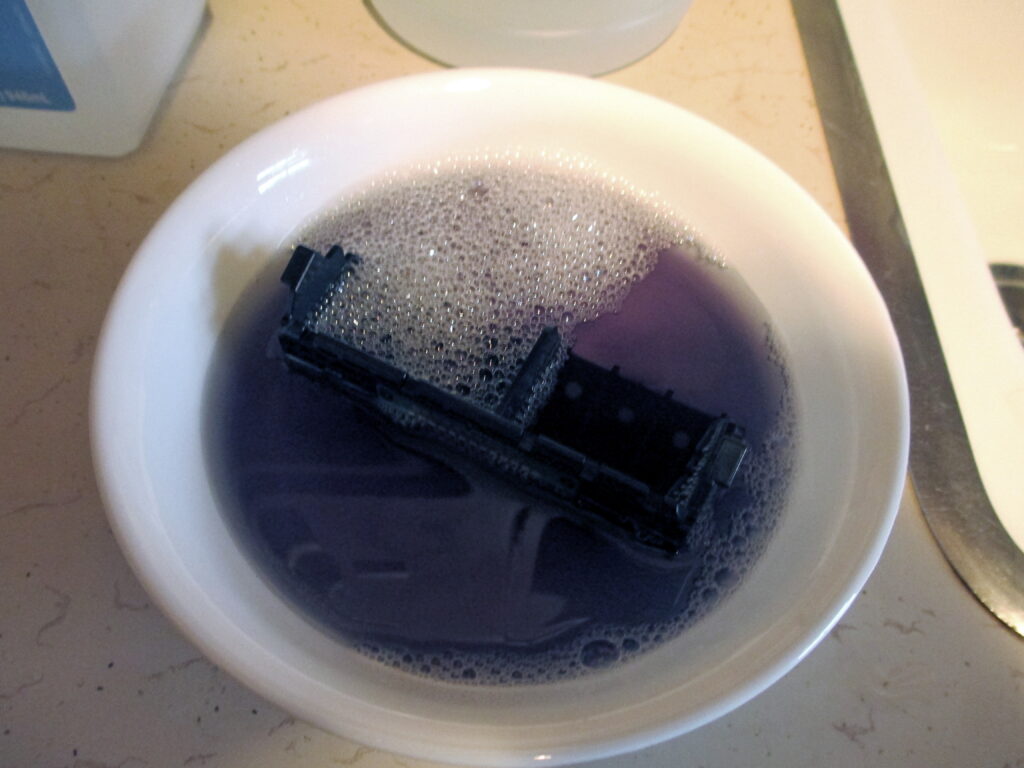
Repeat this process until you don’t see even a trace of color in the water after a good soak. It will take five or ten times. In between soakings, run the printhead under the tap until the water runs clear. Be especially careful to clean the little screens in the ink intake ports. They seem to collect ink-colored gunk, and I think that gunk is likely to be the problem you’re trying to solve.
Between soakings, also blot the bottom of the printhead on folded paper towels. If you see ink, you’re not done yet.
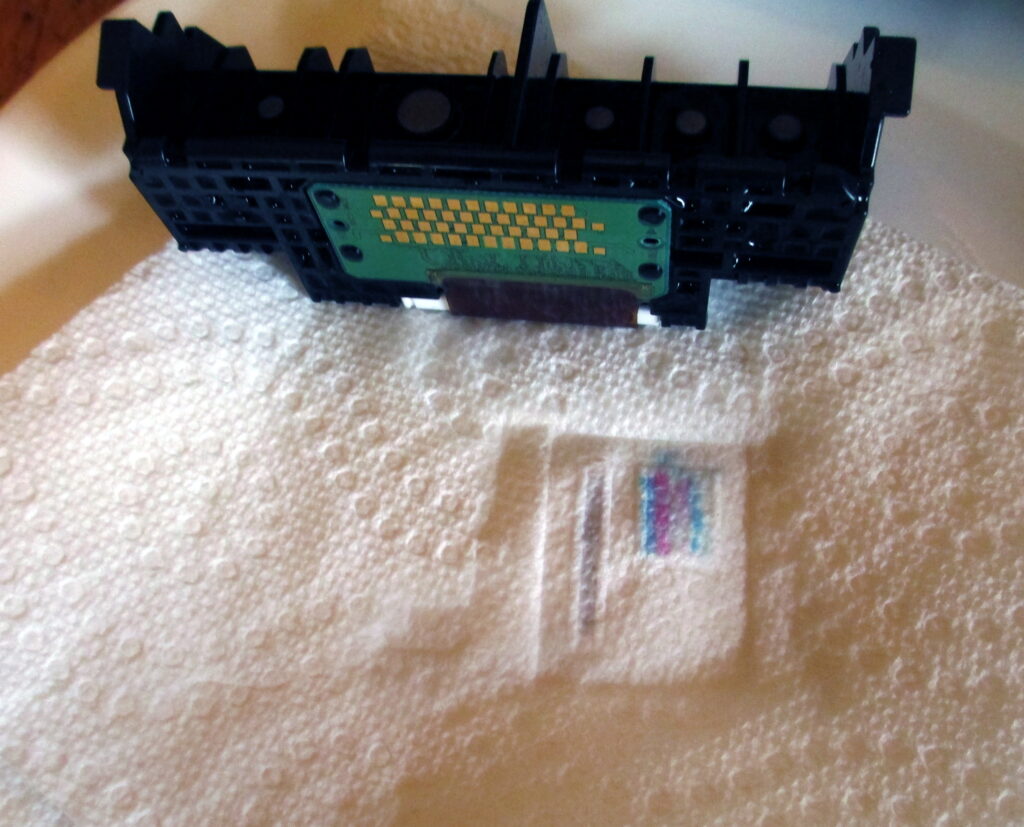
If you have one, you can try using something like a Water Pik, with warm water. Direct the stream into the screens not into the bottom of the printhead — you want the clog to come out the bottom, not get pushed back in.
When you’re done the screens should be screen-colored, without gunk or ink residue. Dunk and swish the printhead one more time, this time using half distilled water and half alcohol but no ammonia.
Dry the printhead on paper towels. If you’re in a hurry put it in the oven with it set to 120 degrees F for a half hour, or dry gently with a hair dryer. If you’re not in a hurry let it air-dry overnight. When you’re done you should be confident the printhead is dry inside and out. If you heated it, let it cool before reinstalling it.
Reinstall the Printhead
Put the printhead back in the same way you took it out. Start with the contacts up and the ink intake ports down, with the bottom of the printhead going in first. If you do it that way it will just drop in once you get it aligned right. Close the latch to secure the printhead.
Be very sure that the green printed circuit board with all the gold contacts on it is facing straight up, towards the ceiling, as you insert the printhead.
Get Ready To Print
Put the ink cartridges back in (in the right slots!) I would replace any that don’t have a decent amount of liquid ink in them. Close up the printer (don’t forget that bottom cover) and plug it back in.
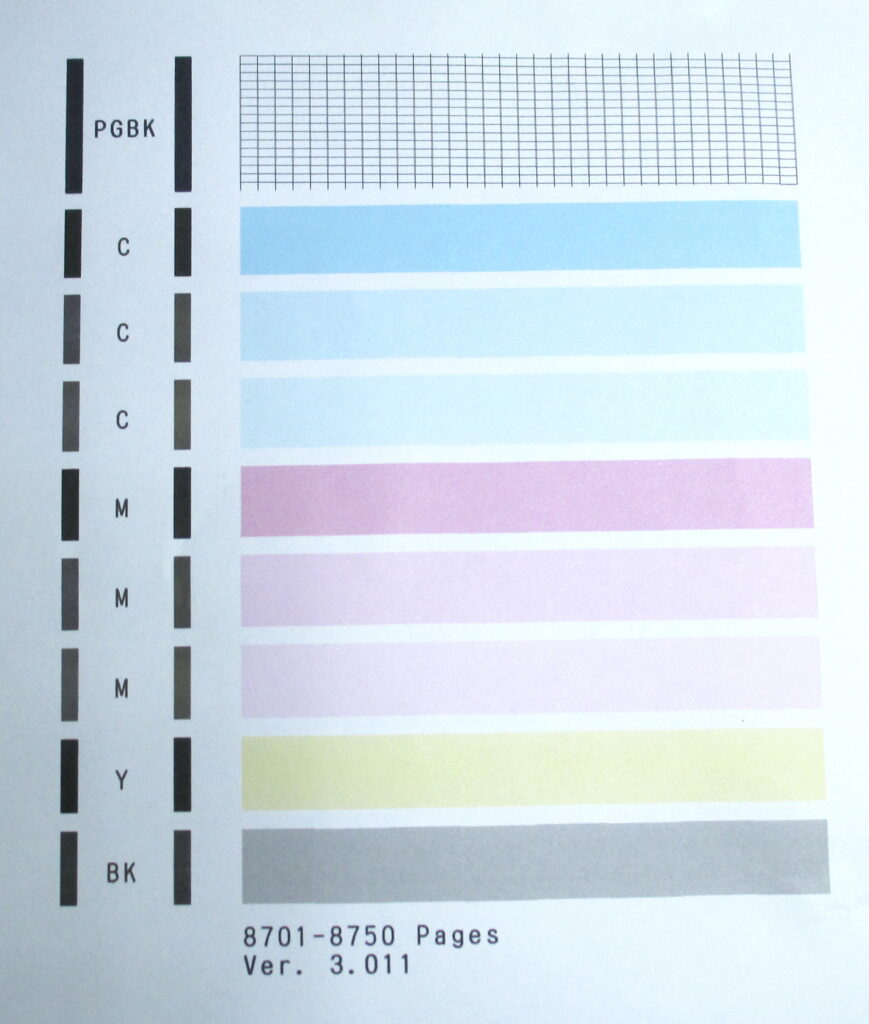
Turn it on. It will complain about being unplugged while on, which is OK. Run a deep cleaning, then run a nozzle check.
If everything went well, the nozzle check will be perfect. If not, run some more cleanings.
If this procedure doesn’t fix your printer, well, you’re no worse off than when you started. Be sure to Google any error codes before giving up; you might have the cartridge in wrong or something else might be wrong that’s fixable.
With a bit of luck, the printer should be good for another couple of trouble-free years.
If You’re Getting Double Printing
I recently got a printer that had been sitting unused for a few years. I expected all sorts of trouble, but after replacing all five (dry) ink tanks, it started printing pretty well. However, some of the black print was strangely doubled horizontally.
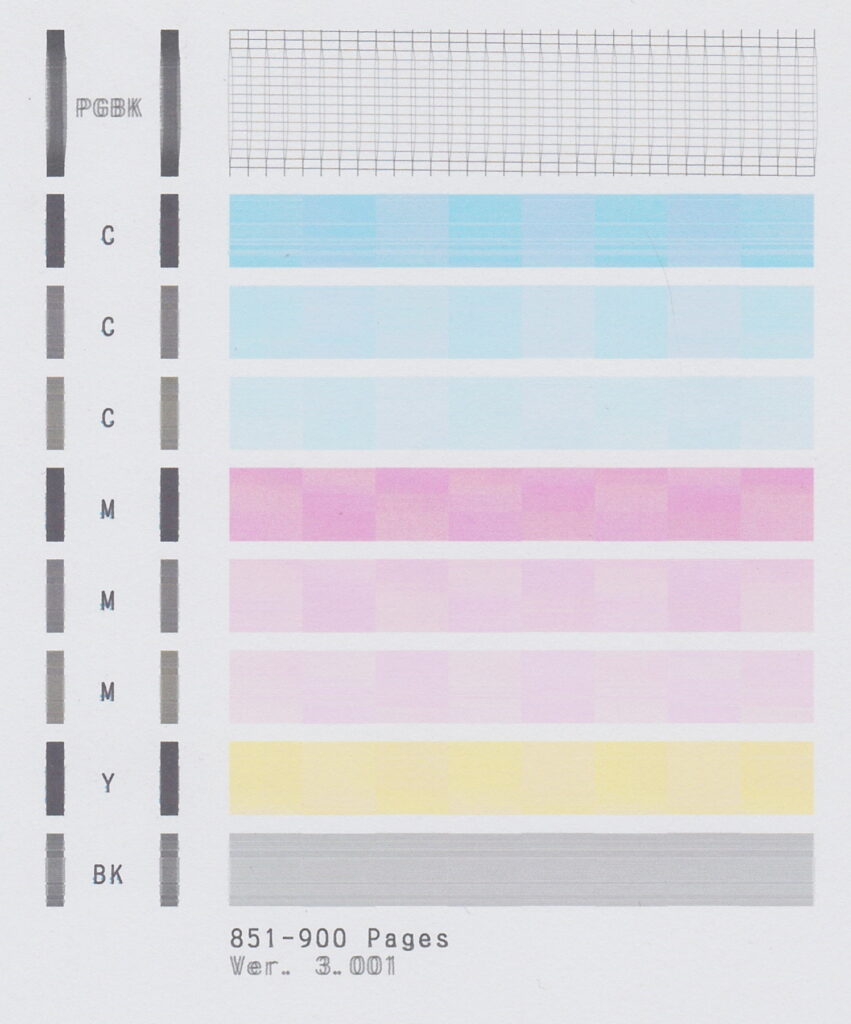
Look at the “PGBK” or the “Ver. 3.001” or the middle of the PGBK grid.
I don’t have any idea what causes double printing. Since printing happens in two directions, it might be that the affected nozzles are firing a bit early or late. I was also thinking that the nozzles might be aimed wrong due to debris in them, but that wouldn’t change the print position with printhead direction. It’s a mystery.
I went through the process described in this post. The printhead did look like something was wrong with the middle part of the PGBK ink nozzles. Cleaning cleared that up. But after cleaning, the problem was still there. I’ve ordered a new printhead and hopefully that will fix it. I’ll report on my success once I try the new printhead.
But, while it’s probably worth doing a good cleaning if you have double printing, don’t be too surprised if it doesn’t help.
The clearest explanation on the way to clean the printer’s head. I really appreciated the information Thank you very much, Paolo Tenti
Perfect description ! Worked like a charm, thanks a lot !
Thank you for posting this cleaning procedure. It saved me from having to buy another printer. I was only able to print black for months. I figured the printer was beyond repair. I even left empty CMY cartridges in it for months. I really didn’t think that cleaning the printer head would work at this point. But it did. Now it prints all the colors fine now.
excellent explanation, much clearer than others I have found
My printhead is soaking as we speak. Thank you so much for this clear explanation, particularly on how to remove the printhead on this model. They don’t make it easy. Fingers crossed it worked, but regardless this was an enjoyable read.
Update: It worked!! You saved me from having to buy a new printer (and throw the old one out). I cannot tell you how happy that makes me. Seriously, the tone in this piece is fantastic, would read even if I didn’t have printer problems. Well done.
Mine double prints, black text. It’s challenging to read. I’ve replaced ink, cleaned, deep cleaned. Will cleaning the print head fix this issue too? Seems to me an alignment issue, not a clog, but really.. I am clueless.
It doesn’t sound like it is likely to be a printhead issue. Try printing a Nozzle Check page, scanning it, and posting it here. You can also try changing the paper type to Matte Photo, which will cause black to be printed using the small black cartridge instead of the big one.
I’ve followed your method and still got the error message and no ability to print. I then improvised trying to blow air by mouth thru the interior pathways using clear 1/4″ and 3/8″ ID vinyl tubing – Nope. Using the tubing to clear all evidence of ink by sucking colored foam back thru the screens until clear foam only. Then let it soak over night. Still not getting forward air pressure thru. Unscrewed the electronic white bottom plate and gasket, soaked more… still no thru pressure relief.
So off to the oven @170F for a couple of hours… After that I reassembled and reinstalled inmy MX922 and …
still got error 1405!! Argh! so now onto buy a “correct print head” for what ? $50 to $100 🙁
Sorry the cleaning process didn’t work for you. It only solves certain problems, and then not always. Used to be that the printhead was more expensive than the printer, but since the MX922 was discontinued they’ve gone up to $250 or so. So in my opinion it’s worth getting a new printhead (if you’re 100% sure that the printhead is what’s wrong). Otherwise just get a new printer — we’re all going to have to eventually.
Please let me know where you can get a new printhead for under $200. I am also not able to print after cleaning. No error messages, just very bad quality.
There are non-OEM printheads available right now on eBay very cheap (less than $50). I don’t know how good they are, though I will know soon as I bought a couple of them. Also they come from China so it takes a few weeks to get them.
I suspect this is a closeout price and once they are gone there will be no more.
Good luck!
Hello very good information, mine is saying printing but it goes through all the motions and blank every time
Well that’s a mystery. Sorry but I have no suggestions. Maybe buy a new printhead?
Worked like a champ! Much appreciated 🙂
I have the very problem that you describe. Thank you for taking time to offer a solution.
Would you please tell me what ratio of distilled water, isopropyl alcohol, and ammonia you blend together?
Thanks again for offering this suggestion.
After cleaning it, I was so hopeful, I put back the print head. It now makes a clicking sound when it is printing. Printing in grayscale is almost invisible and color printing is black and yellow only. I put in all new printer cartridges. I went from bad to very much worse.
It sounds like the printhead is not installed correctly. Nothing about the cleaning process should result in a clicking noise. I’d take the printhead out, look at it for something that might cause the clicking noise, and put it back in carefully. If that doesn’t work I’m afraid you’re out of luck.
There are new non-OEM printheads for sale on eBay for less than $50. However, replacing the printhead would be a gamble because it sounds like something else is wrong.
I want to retract my comment. After cleaning my printhead I put in the cartridges that were refills from Costco. I had just gone into Costco in March before they removed their photo/ink services so I thought those cartridges would be fine, they always worked. The print was worse than ever. I did several of the print tests and utility cleanings and still nothing. Then I remembered I had a new package of ORIGINAL CANON ink. I put those in and YAY, it prints beautifully. It might have been the refills all along, but having a clean printhead cannot hurt. SO, with using the old refills, do you think after doing the 5 utility print tests, 5 utility cleanings: general and deep, I have gunked up my printhead, again? Thanks so much for your advice.
If it’s working, don’t mess with success! If it starts printing badly, clean it again.
I’m surprised that you had trouble with non-Canon ink. I use it exclusively and have had no trouble, though I’ve never used Costco. I get mine from Amazon, usually buying whatever’s cheapest; my recent ink purchases were from Inkjetcorner, EZink, and OfficeWorld. Throw out the Costco ink and buy some that has decent reviews from Amazon.
How did the replacement print heads from ebay workout? I have print head error message but cleaning did not work so I may need to purchase a new one as I love my Canon mx922.
The cheap printheads did work for me. I updated the post to reflect this. Thanks for asking! -jimc
Hello
I got a canon-mx922 for my brother for free from Craigslist. the poster indicated printhead issues and I figured it’s worth a try to replace a $25-$30 part.
Thank you for the explanation. I need clarification before purchasing the print head. I saw one at Walmart and it stated color print head.
Are there different print heads for black and white and color? Or are they the same?
https://www.walmart.com/ip/QY6-0086-Color-Print-Head-Printer-Print-Head-Replacement-Kit-For-MX922-MX928/5065267229?wmlspartner=wlpa&selectedSellerId=101084863
Hi, Sorry for the delay in responding. There is only one printhead, which holds both color and black ink tanks. The printhead you need is part number “QY6-0086”. If the listing says that it’s the right one. Also, I’d check on eBay as there are reasonably-priced new printheads there (from China). -jimc
Hello there. I am having a problem reinstalling the print head of my Canon MX926 printer. The print head appears to be jamming in the open position. Could you please give me some diagrams of how I fit the print head? Thanking you
It’s very tricky to get the printhead in (or out). I just spent a half hour fussing with a printhead on a similar printer, but eventually got it in. Keep trying. It sometimes helps to approach it from a different angle — if you’re sitting down, try standing up, try when standing on the other side of the printer, turn the printer 90 degrees, etc. It also helps to look closely at the notches on the side of the printhead, and the grooves in the printhead carrier. There are big bumps on the sides of the printhead that must slide into grooves in the carrier. Make sure the printhead release bar stays pulled out; sometimes it will snap shut without you realizing it.
If you get the printhead stuck, again be sure the release bar is pulled out, then just wiggle and pull. If that doesn’t work, pull harder. Things will flex but it’s hard to break anything.
Good luck…
-jimc
Any new ideas regarding the double printing by the PGBK print head?
I cleaned my print head thoroughly per your instructions (even removed the white nozzle plate, blew it out with contact cleaner – cleared lots of gunk) and everything works just fine when reinstalled, except the PGBK – still double printing!
I wish I could determine if this was a physical malfunction of the print head, or an electronic component.
I have no idea what is causing the double printing. I bought a cheap non-OEM printhead off eBay and that fixed the problem.
It worked. Thanks! If one follows the directions exactly as you have outlined, it works. Glad to have my good old printer back and working. It is better than new. Cleaning by hand is the way to go.
It worked! Having read one of the above comments from Keith, I decided to unscrew the electronic white bottom plate and rubber gasket while soaking as he did. After numerous rinses, I put the print head in a Breville Smart Oven at 120 degrees F with super convection for 30 minutes and crossed my fingers. Thank you!
Very useful, thank you? Quick question; you say “If you have one, you can try using something like a Water Pik, with warm water. Direct the stream into the screens not into the bottom of the printhead”. Could you clarify this? What are the screens and what is the bottom of the printhead?
The screens are where the ink from the ink cartridges enters the printhead. The bottom is the part that passes over the paper where the ink comes out. This should all be very clear once you remove the printhead and are holding it in your hand.
THANK YOU! Not perfect, but it is now printing in black and white, which it wasn’t doing at all before, and is virtually all I use it for. I am so happy not to have to buy a new printer, particularly as none of them get very good reviews.
I followed the directions and had no issues except to the point where i’m reinstalling the print head back in. I got it in all the way, but the printhead release bar is stuck foward, and won’t snap back. The left side start to snap back but the right side seems stuck and I cant get it to budge. I’ve tried to take out the print head and put it back and tried again. Again, the right side of the release bar wont budge, only the left side. Any suggestions?
It’s very tricky to get the print head in. All I can suggest is to keep trying. It helps to try from different angles (rotate the printer a quarter turn, use your other hand, etc.), to examine the printhead and the opening for it closely to try to see how it goes in, and to walk away and to try again later. When you eventually get it right it will go in easily. Keep trying, and good luck!
How well does this cleaning process work if the alcohol and ammonia are omitted? I’m trying to fix my grandmother’s printer, and we didn’t have either, so I cleaned it with just water until it seemed to have gotten all the ink out. (It’s currently drying overnight, will update once she puts the printhead back in and tries to print tomorrow.)
For context of what went wrong with it, the printer was giving error B200, and the troubleshooting instructions I found online suggested cleaning the printhead but didn’t specify the ratio of alcohol to water, so I looked for better cleaning instructions and found yours.
I would guess that water might work, but the alcohol and ammonia clean better. If you don’t have them available, you can try a 50/50 mix of Windex and water. So, if the printhead works after cleaning with water, you win. If not, clean it again with either the alcohol/ammonia or Windex solutions. Alcohol and ammonia are cheap and readily available at most grocery and drug stores. Good luck!
Update – the printer is unfortunately still throwing the error. I’m not sure that it is the printhead, as I cleaned it until there was no trace of ink in the water, even using a water pik.
I’ll pass this advice on to her, as I’m going to be away for a few days. Hopefully cleaning it with the alcohol/ammonia solution fixes it, if it is the printhead that’s the issue at all.
The B200 error can be caused by a lot of different things. Here is a list of things to try that I found by searching for “MX922 error B200”:
Turn off the printer and leave it as it is for the next 30-40 mins. It will reset all the functions and the printer will be cooled down.
Check for any paper or carriage jam inside the printer. If any, then open the front door of the printer and clear paper jams and rotate the ink carriage.
Now clean the print head with the help of a computer-based printer maintenance tool.
The next step is to replace the old cartridges with the new one.
Install the latest Canon printer drivers on the computer.
Lastly, you need to manually clean the print head with a wet cloth or tissue paper. Clean the gold strips of the print head.
I would concentrate on looking carefully for paper jams, especially small bits of paper caught anywhere in the printer. I’d also replace all the ink tanks with new ones. Cleaning the printhead, as you are doing, might help but a clogged printhead is far from the only cause of the B200 error.
Good luck, but it’s quite possible that you’ll end up having to replace the printer. There are few good options available these days. I’d suggest looking on eBay for a used but working MX922, and expect to pay quite a bit more than you paid for your current one.
Is there a waste ink well that can be emptied and cleaned?
No, I think there are big absorbent pads that are where waste ink goes. They can be replaced, but that requires almost-complete disassembly of the printer, which in my opinion is not worth it. I also doubt if replacement waste-ink pads are available.
good day — i have a MX 922 that works flawlessly until recently. i use Amazon NON OEM ink cartridges. they work well ( V4 INK) is the company on Amazon.. I have recently notice double printing ONLY on black ink. I removed the print head with a little work and used warm water ( microwater water in a glass for 30 sec) and put print head in. clening done several times until all clear -BUT the double printing reappears only on black. i replaced the cartridge also.. i will try the nozzle scan and see if i get the distorted black and white grid shown above. also Ebay sells replacement print heads from China for $75 +/- and up to $110.. i have not purchased a new head yet
lee
I was only able to solve the double-printing problem by replacing the printhead.
-jimc
I have really bad double printing coming from only the PGBK black cartridge. All the colors are still crisp and sharp after cleaning the print head. I ordered a $40 print head from AliExpress, when I get it I’ll let you guys know if it solved the problem. I really love the MX922 and want it to keep working for as long as it can.
I went through the cleaning as described, but it didn’t work. While reading through comments, I saw the post from 6/22/22 that included the suggestion to “rotate the ink carriage”. Can you explain what this means??
Good question! I have no idea. That block of instructions came from some other website that I found by searching for “MX922 error B200”. Try that search and see if you find something that helps. Generally if you have a B200 error that you can’t find a cause for, there’s not much you can do. Sorry.